Pages

Sunday, May 21, 2006

The Great Raccoon Release

Today was the perfect day for releasing rescued raccoons into the wild...not too hot, a bit overcast and with a mild breeze. My friend went to the rescue preserve and they wrangled 5 fiesty, bright eyed, fat and sassy raccoons, gave them antibiotic shots and stuffed them into an extra large dog crate. She drove out to my house. The raccoons were trying to escape the dog crate - making lots of racket and rocking the cage wildly.
Photobucket - Video and Image Hosting
She picked up my DH and me and we headed for the release site in the Santa Ana Riverbed Wilderness Area.
Photobucket - Video and Image Hosting
Five raccoons in a dog crate weigh more than 150 pounds...quite a bit of a load to haul. Where we parked is a staging area for horses and a couple of caballeros offered to help my DH with hauling the crate with the raccoons and the bags of dog food (to help the raccoons adjust to their new home) Even with three strong men, they had to stop frequently and readjust their hold on the cage.
Photobucket - Video and Image Hosting
We got down close to the river and opened the cage. The raccoons were a bit reluctant to vacate the dog crate! Finally a couple of them headed out and made a beeline for the water.
Photobucket - Video and Image Hosting
We ended up taking the crate apart to get the final three raccoons out. One jumped out and ran under the top of the crate (Gimme shelter!) Finally all the raccoons were out and had headed to the water.
Photobucket - Video and Image Hosting
I see WATER!
Photobucket - Video and Image Hosting
One even looked like he was going to swim to the other side of the river but he noticed his buddies had stopped at a neat looking tree with a cave under the roots and swam over there instead.
Photobucket - Video and Image Hosting
I hope they have a good long raccoon life!
Photobucket - Video and Image Hosting
Home Sweet Raccoon Home!

Sunday, April 30, 2006

Color and Composition - Week One

My Still Life:
Photobucket - Video and Image Hosting


Here are my blind contour studies of the still life:
First pass with no peeking
Photobucket - Video and Image Hosting


Second pass with some peeking
Photobucket - Video and Image Hosting


Third pass looking at still life but not at the page
Photobucket - Video and Image Hosting


I still have to do the exercises for contour cutting and contour stitching. I did get a bunch of fabrics out of my stash and only have to get a few for the color wheel - mostly the grays - I found I had a very nice medium gray, but the inbetween ones are not quite there. I may try to dye the grays with the Tsukeniko inks if I cannot find them at the store on the way home tomorrow. I did find a few in the printed side, but need a couple more there too.

April Journal Quilt Challenge - The Promise

April's Journal Quilt Challenge:
This is the pencil study I did for the piece on Palm Sunday, 2006
Photobucket - Video and Image Hosting


Front of Journal Page
Photobucket - Video and Image Hosting


Photobucket - Video and Image Hosting
Text of Back:
This month I am exploring the wonder of God’s Promise
Palm Sunday, 2003. My son was playing the part of Jesus in a Passion Play. The church where this play was being performed was a longish drive from our house. That Sunday morning was drippy and rainy, much like this year’s Palm Sunday. The gray clouds were low and thick with moisture. Since it had rained off and on for the previous couple of weeks, the hills were all green and yellow with a coating of wild mustard plants. On the way to the church early that morning, my husband and I saw the most amazing sight – the clouds parted just a bit and a gorgeous rainbow lit up the ground underneath the break in the clouds. It just seemed so appropriate for us traveling to see a Passion Play to witness such a bright symbol of God’s Promise. I drank in the sight, made a quick sketch on the back of a prescription form and said – “This needs to be a quilt” and I gave it the name of ‘The Promise”, but I had only been quilting for a few months at that point, so I did not know how to approach a landscape quilt. This year, the day before Palm Sunday, I reorganized my sewing supplies into my new sewing room and one of the things I came across in the cleanup process was this scrap of paper with my quick sketch and that became the basis for this month’s piece.

Construction:
Design elements were fused onto the interfacing. I wanted to make ‘thread bunnies’ to represent the trees along the edges of the hills, but ran out of green thread before I could get the machine to do what I wanted. So it ended up being fuzzy yarn stitched to the contours of the hills instead.
The rainbow was trimmed from a piece of material with the rainbow colors but not in the right order so they are little skinny strips of color. The cloud material was purchased at a quilt shop where I safely holed up for a few hours because of a flash flood.
Satin stitching around all the edges of the page completes the construction process.
The rainbow picture above was taken by my daughter Clare.

Thursday, April 20, 2006

Chemistry Lessons for the Fiber Artist

Last Saturday, a bunch of my friends and I got together at a quilting shop and took an 8 step graduation fabric dyeing class. I picked Black, expecting to get a nice progression of grays...I was planning on using it for the black to grays needed for the Color and Composition Class that I am taking on the Quilt Studio forum...sigh...the best laid plans of mice and men...don't necessarily work when playing with chemicals!

Image hosting by Photobucket
Dye is mixed with warm water and salt in a carafe.

Image hosting by Photobucket
Here I am adding the dye to the first Mason jar. The fabric is added and then the lid is screwed down.

Image hosting by Photobucket
Every 15 minutes we shook the jars. Instructor Russ said to be careful of any dyes that have blue in them...Too vigorous with the shaking, and you get an explosion! I was careful (black has ALL colors, including blue in it!)

Image hosting by Photobucket
My friend Julia picked a much better color for progression! A nice yellow. The other colors that the class participants picked were kelly green, violet, red and peach.


Image hosting by Photobucket
Julia's first piece, rinsed out by the instructor, Russ.

Image hosting by Photobucket Image hosting by Photobucket
My results, after washout with Synthrapol and 6 rinses and a full wash with detergent...
Not at all what I expected! I scanned them on top of some real black fabric for contrast. Some of the pieces look olive green, some rather brown and only the last of the eight pieces is grayish. If you are quick, and count the pieces you will see there are actually 9 pieces - the last one in the series was dumped into the leftover dye in a measuring cup...which made it rather mottled. The WOW pieces fared even worse - I have a hard time telling that they any different in shade until I get to the last one....and again the bottom piece was in the measuring cup...

Though my dyed fabric is not what I expected, it WAS loads of fun doing the class. We are going to try the Rainbow progression in a few weeks...that should be way prettier!

Thursday, April 13, 2006

How to Disguise Ugly Fabric...

These two quilts are my entries into the 2006 Arizona Retreat Ugly Fabric Challenge.


Bad Sunbonnet Sue and the AZ Challenge Fabric
Bad Sue Does Some Target Practice (Bang)
Bad Sue Feeds Her Cat (Eww, this fabric tastes nasty)
Bad Sue Cleans Up (What a mess...I'm glad I have THIS fabric to clean up with!)
Bad Sue Has A Fabric Roast (Snap! Crackle! Pop!)
Bad Sue Gets Into The Chicken Coop (Oh No...She's making me nest in THAT fabric. My chicks will go blind!)
Bad Sue Slashes Away (Snippety-Snip-Snip-Snip)
Bad Pirate Sue Gives Her Prisoners A Bad Choice (Wear the dress or... walk the plank - NO! I'd rather jump than wear THAT dress...)

This quilt was inspired by Shelley’s (Pirate) ‘comments’ about the Challenge Fabric that Ami (SewingUpAStorm) supplied for the 2006 Arizona Retreat…Bad Sunbonnet Sue does all those bad things Shelley wanted to do to the fabric!

Designed and Quilted by Suze (Casuzen)
January 2006


Escape Velocity
Adapted from the 'Summer Breeze' pattern by Annette Rose

Easter Eggs


When I got to work this morning, I discovered the Easter Bunny had visited our department - there were colorful plastic eggs filled with all sorts of candy, dollar bills and coupons hidden in all the cubicles. It was fun hunting for eggs as there was a random number in each office...Hours later you would hear "I found another one!"
The eggs reminded me of one of my favorite Easter stories. Warning...Get a tissue before you click on the link!
The Empty Egg
(this story is credited to Ida Mae Kempel on some sites, others say its an unknown author...)

HAPPY EASTER TO ALL

Sunday, April 09, 2006

Presenting My New...

SEWING ROOM!!!! My son moved to his own place last weekend, so the room he was in became a guest room/storage room/office, while the room where my drafting table was became my sewing room. I have been dreaming of this for months! I started at 8:30 Saturday morning and worked almost non-stop until 8:30 pm...I had a brief break once I moved the desk in for my sewing table and realized that I needed shelves for all the supplies! So I dashed off to the home improvement store and bought a couple of 'do it yourself, easy assembly' shelve sets (False advertising - see below!). I moved boxes, bookcases, clothes, made up the guest bed, vacuumed (twice), dusted, rearranged, built two sets of shelves, did 4 loads of washing and generally wore myself out...I am exhausted and sore, but very happy!
Image hosting by Photobucket
This is my 'design wall' - 2 yards of white diaper flannel.
Image hosting by Photobucket
This is the computer desk I appropriated for my sewing table...Notice the machine is set on the keyboard holder so that its level with the table. Haven't tried this setup yet, but sitting in front of it is comfy!
Image hosting by Photobucket
These are my storage shelves. I had to build them...I cast aspersions on their parentage and the parentage of the designers...the air was a bit blue...everytime I would 'tap' one brace in, another one would pop out...the whole thing collapsed several times...but I perservered and...have shelves..very FULL shelves...I did not realize just how much quilting stuff was stashed around the house! But, its all in here now.
Image hosting by Photobucket
This is my office, where several times a week I work from home...love the 6 second commute!
Image hosting by Photobucket
This is my drafting board - cutting table... I love that its just the right height for me so my back does not get sore.
Image hosting by Photobucket
This is my stash...it needs reorganizing...
Image hosting by Photobucket
This is the bottom bunk in the other room made up as a daybed. It needs its own quilt! I think it turned out pretty cute. I used the mattress from the top bunk for a bolster - the top bunk is being used for storage - mostly wrapping paper and the junk (err, 'stuff') my DD left in the closet when she moved out. Notice Misty the Cat enjoying the bolster! (all three cats have explored the area and have given their stamp of approval on the improvements)

Saturday, April 01, 2006

Signs of Spring

It's starting to look like spring!
This is my Saturn peach starting to bloom. Normally this tree blooms in February and has fuzzy little green peaches and lots of leaves by now.


I saw this red-headed, red-breasted bird sitting in my apricot tree. There were actually two pairs of birds, the males with red and the females were much duller with kind of a yellowish tinge. I had to look them up on the web and found they are House Finches and the red color comes from their diet.

March Journal Quilt Challenge - Hope

Here, at last, is March's Journal Quilt. Better late than never...Sorry, was sick most of the month and was just not very inspired to get to finishing the back and binding. Finally got a little burst of energy today. Anyone notice I have kind of a sub-theme going on with my pages? They all have blue backgrounds so far!! ::cue music::Blue skies, shining at me, nothing but blue skies can I see....::music fade::

Text from back:
The daffodil, one of the first flowers of spring, is a symbol of hope. Hope for a world free from disease, hope for a world free from strife. Hope gives us the strength and courage to keep going, with the hope that there will be better days coming.

Construction:
The flowers and stems are free-form cut out of one single piece of batiked fabric that I pre-fused. I did not heavily quilt this piece, as it seemed to ask for simplicity. I accented the flowers and quilted over the stems in the vase to try to give the illusion of the stems being behind glass.

Satin stitching around all the edges of the page completes the construction process.

Wednesday, March 08, 2006

Retreat, Arizona Style

I was fortunate enough to attend a retreat in Arizona a couple of weeks ago with a lovely bunch of quilters who mostly met thru the About.com Quilting Forum. One of the activities at the retreat was to make a Mystery Quilt. The pattern is called "On the Road Again" by Debbie Caffrey. We sewed and sewed with clues being handed out every so often.

There was a main room where we ate and had gatherings - in the back of that room were three ironing stations with big board ironing tables (I gotta make me one now that I have experienced the joy of being able to iron large pieces easily!), and two cutting stations with oodles of rulers and rotary cutters. There was a smaller back room that had the sewing tables with two sewing spots on each table. Sometimes we spent more time gabbing and laughing than sewing, but it was all great fun!

Some of the other activities were an Ugly Fabric Challenge - the challenge pieces were hung in a local quilt shop and all the customers got to vote on their favorites. We tried to guess who made what, but most people were really sneaky and did not use their normal styles for making the pieces. I was even sneakier and entered two pieces which caused quite a lot of consternation when the numbers and the names did not add up!
Here is a picture - Mine are the Bad Sue cartoon quilt on the left and the flying geese on the black background on the right. The one that won Viewers Choice is the fan hanging between my two...

We also had a Birthday Gift Exchange (done in Chinese Auction style) - I made a scrap catcher as my contribution and ended up with a book on thread painting whose techniques that I want to try out really soon. There were some really nice gifts!

I was one of two that finished all the steps before the retreat ended - the rest got to varying stages of closeness. Here is my Mystery Quilt top, with a border added - the main fabric that I chose had this lovely border print so I got enough to make the borders and I think I have enough of the main fabric to make the backing (or at least most of the backing!) I was pleased at how the mitered corners turned out...not as hard as I feared, especially if use lots and lots of pins!

Tuesday, February 21, 2006

February Journal Quilt Challenge - Love Is A Journey

This month I am exploring the wonders of the Journey that is Love:


Text from back:
This quilt is dedicated to my Life’s Partner, my Best Friend and the Love of my Life, my Dear Husband.


Symbolism on the quilt:
The two paths leading up to the heart are two separate lives merging into one in love. The heart has a sun shining to represent the warmth of love. The beam radiating out of the heart is to show the world that love is flourishing within. The two golden rings at the top represent the marriage state. The sky and the mountains with the field of flowers represent the world that love journeys through.


Construction:
The black frame is made of a single piece of fabric with fusible on the back. After the ‘windows’ were carefully cut out, the ‘glass’ pieces were added – I used Glue-Baste-It to hold the edges under the fusible until I was happy with the fabric choices. Then I fused the frame down onto the window fabrics and carefully lined up the piece according to the registration marks on my original drawing to get it centered correctly, and then the whole piece was fused to the interfacing. I quilted around each of the ‘windows’ and added the back piece. Ink enhancements were added after quilting. Satin stitching around all the edges of the page completes the construction process.

Thursday, February 16, 2006

Feb Journal Quilt Progress

Since my Journal Quilt page for February has the front finished, I thought I would share some of the design leading up to the page:
This is the drawing I started out with:


I originally had something totally different in mind, then switched to a drawing my daughter did many years ago, but ditched that as not being original enough. This drawing was an attempt to get something close to Melody Johnson's style, but I realized two very important things as I was making this: 1 - I don't know enough about Melody's style -so I hope I can sign up for her class at the next Road To California, and 2 - I don't have the luscious fabrics she uses so even if I DID come up with a design that's a similar style, its never gonna look even remotely similar because of the fabric...Oh well..I ended up liking what I did do! I decided to make this into a 'stained glass' style, though I did not use the stained glass look fabrics...

This is the second stage where I converted the drawing to a pattern for the black leading for my 'stained glass':


More later! I just need to figure out the wording for my label, print it, fuse it to the back and do the satin stitching around the edge and I am DONE!

Sunday, February 12, 2006

Artist's Way Check In - Week Twelve

Final Check In for The Artist's Way book

Wow...Cannot believe its really the last check in for this book...I am so looking forward to starting on the next book!

Tasks:
1. I don't think I HAVE any resistance, angers or fears about going on from here. I am looking forward to the continuing process...
3. Core negative beliefs...Didn't think I had them in Week One...still don't think I have them...
4. Mended a sock for DH...
5. No languishing plants that need repotting...Could use a few more new plants but need to get more potting soil for the pots before I ask my DM if I can have some more cuttings.
6-7. The God Jar reminds me of a story I wrote many years ago about a boy and his troubles. It is titled "Thomas and the Trouble Tree" in which Thomas learns to write or draw his troubles on slips of bright colored paper and tie them to the branches of his 'trouble tree' - the theory being that you give the troubles up to the tree and it will hold them for you so you no longer have to think so hard about them - when you are ready to deal with the problem, go get it back off the tree, but you might just find its blown away in the breeze... I mentally do this with the tree in the back yard..and have for years...so I didn't think I actually needed to create a God Jar...

Check In:
1. Did pages 6/7 days. I shall be continuing to do them.
2. Artist date was poking around in a real art store...I was looking for a Niji waterbrush but they did not carry them, sigh...Have to find another store that does. Artist Child is fascinated by the concept of the waterbrush...(yeah...I know I COULD order them over the internet but I want to 'see' one in person first...)
3. The author of the book that I got at the signing the other week was on a TV program and my DM taped it for me...
4. Continuing with the DOTRSOTB - I picked up the workbook the other day and read the intro...She (Betty Edwards) says the hardest part is finding time to draw (and by extension any other artistic endeavors)... So you must trick the left side analytical brain into letting you find the time..She recommends the 'two minute miracle' technique...So, if you say to yourself 'I am not really going to draw, I am just going to turn to the next page and look at the next exercise' and then 'I am not really going to draw, just make a few marks on the page' then 'I am not really going to draw, I am just going to sketch a bit of the outline' and so on...You will find the right side can take over, time will pass with you unawares and you end up with a completed drawing...(0r by extension again, a completed project)
She goes on to say: "I realize this may sound, well, stupid, but it does work...You may find this hard to believe, but the single most difficult problem for art students and even for working artists is getting the work done. One is always fighting the delaying tactics of the verbal system, who's mantra is 'Not now'. At it's most extreme, the result is writer's block or artist's block: a milder version is called procrastination."

Sunday, February 05, 2006

Artist's Way Check In - Week Eleven

Chapter Eleven Check In

This week was mostly about success as an 'artist' - I don't think this just means a commercial or monetary success, but emotional as well...and keeping the enthusiasm as we reach creative plateaus. There must always be a bigger goal - for if we actually 'make it there', strangely enough we will find that 'there' disappears. Julia likens the artist to a shark, which must keep moving or drown.

Check In:
1. Did pages every day this week...some were a bit truncated (mostly after the root canal...which kinda wiped me out). I did kinda recommend doing the pages to DH, but so far he isn't buying into it.
2. Artist Date was building the lap hoop with my Dad.
3. No major synchronicities jump out at me...but I did keep seeing images of a particular animal that I want to incorporate into a future project.
4. I am more convinced than ever that the Artist Child is actually the right side of the brain. Will be exploring this more over the next few months as I work thru the Drawing book. Any technique for shifting to the creative mode is welcome.

Did a bunch of the tasks but they are pretty hard to share! I did get the 'Creativity Notebook' but haven't finished working on that task...its a long one!

Have Hoop, Will Travel

My Artist's Date this week was working with my Dad to build a lap hoop - I wanted it to fold up so that its easier to transport and store - most of the ones I have seen are not very easy to transport. Having a Dad that is a mechanical engineer is a very definite advantage when you want to build something like this! This was a very fun project...Now to get busy practicing the 'metal to metal' quilting technique and letting Aunt Becky do all the work!


Closed

Open
Loaded
View from the Top

Sunday, January 29, 2006

Artist's Way Check In - Week Ten

Week 10 Check Ins

I am revisiting week 9 briefly - the section on FEAR really spoke to me and I had to review it again this week. It is fear, of success OR of failure, most often causes that screeching halt to productive endeavors - at least for me that's true. Its way more comfortable to just go along in a rut. I really have to kick myself hard in the posterior to get out of the rut...And there is usually this nasty nagging little voice in the back of my head that voices all sorts of doubts about what I am doing - getting it to shut up is the trick! I am starting to work with the Drawing on the Right Side of the Brain book and I think its probable that the naggy voice is the left side of the brain that just doesn't understand what the right side artist brain is doing (and it hates loosing control to the right side).

Week 10 talks about HOW we find ways to block our creativity. Some of her examples have no relevance to me...I don't drink, don't smoke, don't use drugs...But some are ways I find to block, like eating - circling back around to the fridge and looking in it though you just did that 5 minutes ago and nothing has changed is an avoidance technique - keep telling yourself you are hungry (even if you aren't) and there is nothing to eat and oh woe is me, I gotta eat something before I can work on my project...

I didn't agree with her assessment that competition is spiritual drug and that focusing on competition poisons our well -unless- you truly are using it as a way to stop doing your own creativity because someone else already beat you to 'it'...I think of competition more of a challenge to yourself to get moving..."If they can do it, well then by golly, so could I - after all, they've proved its possible!"

Check In:
1. Did pages 6/7 days...Still haven't gotten around to re-reading what I wrote in earlier days...
2. Artist Date this week was to go to a book signing by a famous author (I can't say who it was because the book is a gift, until after the gifting is done). I had never gone to a book signing before. This author is a bit controversial (though I love listening to the radio program put on by the author) - there were several burly dudes on each side of the author just in case! The store passed out wristbands with numbers on them, you had to line up in order of your wristband number. It was interesting chatting with some of the other ladies (the majority of the people in line were ladies, a couple of guys but mostly middle age ladies!)
3. Syncronicity - My DH had some interesting syncronicity - got a notice for some software updates that were just what was needed...
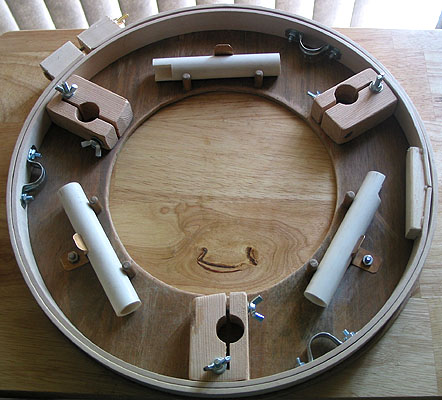
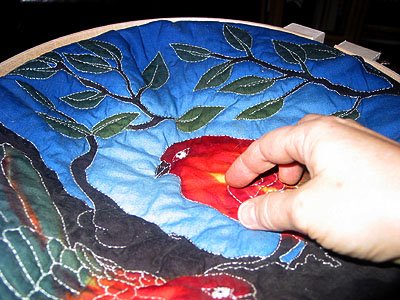
Went to shop at Joann's near my parents house for a quilting hoop (to practise the new 'metal to metal' quilting technique I learned from Jean Brown last week) and the Joann's had closed its doors!(Its a brand new shiney scrapbooking store now - cute stuff but no hoops!) So I went over to Michaels...They had the hoop I wanted, at a lesser price, they took the Joann's 40% off coupon that I was hoping to use, and I used my Christmas gift card to buy it so it turned out to be a really GOOD deal...My Dad and I are going to make it into a lap hoop (next week's Artist Date!) but I wanted to make it so that it could collapse for easier transport...so we are thinking about how to make the legs snap up and down...(I love working on projects with my Dad).
4. I think the working thru the Drawing on the Right Side of the Brain book is going to make a lot more sense after going thru TAW...

Task 2 - Touchstones
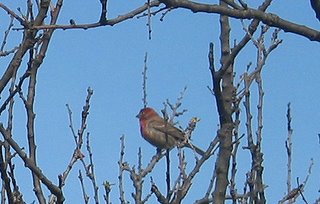
Apricots warm from the sun, blue skys and green hills, wild sunflowers, fat little birds, swans, microbead pillows, fresh coffee brewing with bacon frying, snuggling under the covers when its the 'perfect' temperature - not hot, not cold, the sound of lawnmowing on a warm summer day, mincemeat cookies, chai tea with cream.

Monday, January 23, 2006

January Journal Quilt Challenge - Aurora Borealis

Presenting my Journal Page for January:


Text from back:


Year of Wonders
This month I am exploring the wonders of the Northern Lights, the Aurora Borealis.

When I first thought about the theme for this month – January – I was just going to have a winter scene with snow. Though snow is not a common occurrence in Southern California, we do see it on the mountains and admire it from afar. January to me is the wintriest of winter months. I guess since I have never had to live in the snow, I still have a somewhat idealized view of snow. It looks so soft in pictures, though I know from my limited exposure to it, that it’s not at all soft.

After I picked out my first choices of fabrics, I had them lying on my desk. Nearby was a piece of hand-dyed fabric that my friend Julia and I created. That fabric reminded me of the aurora borealis. I found a couple of sites on the web that had gorgeous pictures of the aurora borealis and that cemented the idea for the page!

I ended up using none of the original fabrics except for the hand-dyed piece. I found a graduated piece of dark blue to lighter blue with golden speckles that seemed to be just right for the sky background. I set that piece of fabric at an angle since the aurora I wanted to depict is at approximately a 45-degree angle. I used batting for the snow to give it a bit of dimensionality. The background is fused to a piece of stiff interfacing to keep the page from being too floppy.

The buttons, beads, and sequins were attached after quilting. Satin stitching around all the edges of the page completes the construction process.

Sunday, January 22, 2006

Class Projects from Road To California

Some of my class work from the Road To California classes I took:


This is a rose ink painting using Tsukineko Inks from the class with Lura Schwarz Smith on 'Inking Your Fabrics':
Image hosting by Photobucket


This is a portrait of a child from the Lura Shwartz Smith class:
Image hosting by Photobucket


These poppies are from the class on applique that I took from Martha Nordstrand:
Image hosting by Photobucket