Pages

Sunday, February 28, 2016

Back from Retreat

Whew..this has been a whirlwind of a month..

Went to my annual Retreat in Arizona again this year. This year I flew because the lady that I used to drive over with from So Cal moved to Arizona! She picked me and another Retreater up from the airport - we coordinated our flights so we would get there and leave within half an hour of each other..I stayed in her guest room the first night and then we moved to the hotel where the Retreat is held.

The hotel just changed hands..and all the staff changed from last year. We have been going to this location since (I think) 2006 or 2007...The conference room holds 32 retreaters - so far, they have only been ladies, but we wouldn't exclude a guy or two! (Some of the husbands occasionally come..one year they went target shooting, another they went to visit the airplane boneyard in Tuscon..)

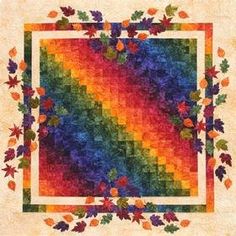
This year the 'big event' was making a bargello quilt. One of the hostesses volunteered to lead the project and we jumped right in on Thursday, making our strata. In deciding to even do the class, I looked at bargello pictures on the internet and found one that I really, really liked its look:


I used 17 of the fat quarters that we got on the last Quilter's Run:

Here is my strata:


What I ended up with is the first nine pieces followed the pattern, the next 8 were the first pattern going backwards...I still had some my two strata left, so I cut that into random sized pieces until I couldn't cut any more and added them to one of the sides...so..its kinda unique!


Like that sample, I will be doing the borders similarly - though I haven't decided if I am going to use leaves or something else for the applique. The picture shows a bias scarf I made at retreat as well..just a wee quickie project!

I finished a bag that was on the donation table - the body of the bag was prepared with lovely hand quilting, it had one handle turned, the other handle was not sewn at all and the lining was already made. I think I know why it was never finished - that remaining handle was a bear to turn! When I got it home, I decided that the handles needed to be thinner than the original, so I folded them and stitched them down..then it needed a button closure so I stitched two buttons on - one with a loop of elastic that can loop over the other button...it has all of my little projects that I brought with me to retreat but didn't get time to work on in and its hanging in my sewing room. I like it!


One of the other activities was making a potholder - first they were posted on a board and we voted on our favorites..then they were used in the Left-Right game - one of the ladies wrote a humorous story that you pass the potholder from left or right depending on the directions in the story..Very funny!

This is my contribution:


And this is the one I ended up with --a pretty pink design:


The potholder display:


And this was all the buzz around the potholder display:

No...those ain't palm trees on the back...after all..it is a POT holder..the front features munchy foods...
Not surprisingly, it won first place in the competition!

Monday, February 08, 2016

More Hexie Daisy Progress and Packing for Retreat


Here are a couple of shots of my experiment with back stitching hexies - it works much better if the opposite outer edge is supported with a WonderClip. Do I like it? I think so. It's way neater than the whip stitch...and a bit easier to do than the ladder stitch (no folding) - when I try the ladder stitch, the stitches seem to still show though that may be just practice.. Will have to try to see if I can do this thru the glue on the Wee Hexie Basket...

I still have 14 wee side pieces to add to the pointy sides since I have determined this is going to be a straight edged piece..thought were it goes from there is anybody's guess at this point! 

I am almost packed for Retreat...I don't leave for another week..but I cannot stand not knowing if stuff will fit! This year I am flying, so have to be super conservative on what I bring...

Monday, January 25, 2016

Hexie Daisy Progress

Finished the prep work for the Hexie Daisy block...now on to stitching them all together!


Sunday, January 24, 2016

Road To California Hexie Daisy Class

I don't usually get pictures of me at Road to CA...but this class had several!
Here I am stitching my center flower - almost done so we can show how to stuff the center of the Hexie Daisy
 Teacher Cheryl See is the other lady in teal...
 Showing how I do the back stitch join...

Road To California Report

Fisrt, some eye candy:
Road To CA Quilts

Wednesday, I took two classes on the Brother Scan N Cut...the first one, we unpacked a brand new machine...learned to read the menus, created a card, and cut a purple heart out of fabric (we all went home with purple hearts!)....the second, we learned to pair a Brother Dream Machine embroidery machine with the Scan N Cut..cut the appliques and watched the Dream Machine stitch...
I was less than thrilled with the embroidery machine aspect - not my cuppa tea...but the Scan N Cut...now..the lady packing the boxes after the class I told her she was just gonna have to wipe my drool off it (she laughed) - I loved it!...My friend who was in the class with me bought her Scan N Cut..but whoo doggie, she spent a pile 'o cash! Even with the show special of 20% off, it still was almost $1K to get the machine and all the optional geegaws that go with it...

I made my embroidered piece into a mug rug...

I like the back almost as much as the front:

This is a picture of the Brother Dream Machine stitching out placement markers - it tells you where to stick the applique pieces on that you cut with the Scan N Cut

And then it tacks the pieces down and satin stitches them...automatic thread loading, cutting  - practically does the whole thing for you! And..no thread tails on the front of the piece - not quite sure HOW it made all of them go to the back ...probably magic...
The machine I was using kept un-threading its needle...so though its automatic, it was a bit frustrating to have to re-thread the machine...

Friday, I took a 'thread sketching' class from Shannon Shirley..utterly fantastic class...I was able to get my entire quilt DONE..not just the stitching/quilting, but the binding, stitching the back of the binding down AND dissolving off the washaway that we used to 'transfer' the design from the pattern to the fabric...
First, we traced the pattern onto dissolvable film using a Sharpie pen:

My hands have some kind of grease that makes the Sharpie pen marks rub off the dissolvable  film...the teacher let me borrow a pair of Graberoos - they are kinda like Machingers, but purple (so they don't get as groody-looking as the white ones) - and they don't make my hands hot! That solved the problem so I have a pair on order from Amazon...tried to find them in the vendor mall, but couldn't locate a pair...

I learned a new binding join technique that is fast, accurate and non-frustrating..and it requires no measuring or pins (whoohoo)
Here my finished piece:

I LOVE, LOVE, LOVE that it is finished! G thinks it could use some color..so maybe I will attack it with the Inktense pencils...have to try coloring the pattern first though to see if I even like the effect...

Saturday I took two classes...one on hexies from Cheryl See, who won the Best Use Of Color for her Starlette hexie quilt at last year's Road...and the other was a Zentangle pincushion class put on by the Janome dealer...
The hexie class was very interesting. She had us cut at least 70 two inch squares of a color family from our stash..mine is GREEN of course! (If you know me, you know I love green!) I actually had 82 green scraps without cutting any of my yardage or fat quarters...
There were only 8 students, so we got very individualized attention from Cheryl....we arranged those scraps in a watercolor format on our quilt scrolls - I made mine using a pool noodle, a piece of fleece, the cardboard tube from a dry cleaning pants hanger and two hair scrunchies...after I got fabric on the fleece, I regretfully realized that the back side of fleece is equally sticky..Yikes! So, right now I have a large plastic bag inserted into the roll to keep the wee pieces of fabric stuck to one side of the scroll...I will have to back the piece of fleece with something ...maybe one of the home dec fabrics would work...

Here is my hexie daisy block on the scroll:

and here is the hexies I got done in class - the center round is stuffed - the petals have to wait until the surrounding hexies are stitched on to be stuffed..

Learned lots from the Hexpert! We traded stitching techniques and I showed her the doodled hexagons...She had never seen the 'back stitching' method nor doodled hexies...
The Zentangle pincushion is cute...I like how mine turned out but the relaxing part of the whole Zentangle experience was out the window! We stitched on a piece of fabric that was prepared using Terial Magic so you don't need stabilizer..it was kinda fun picking the patterns on the Janome machine..and it is another COMPLETED project..so there is that - but it was a bit stressful not knowing exactly how big the patterns were going to come out (the machine does give you a hint, but I was so unfamiliar with the machine that it didn't register til almost the last line I stitched)

So..the hexie daisy block is my ONLY UFO this time..pretty darn great!
I did not buy too many things at Road this year...

10 zippers in assorted colors - they were only 50 cents each! The wee and very sharp scissors - the blade guard is attached so it cannot get lost, a very cute snail tape measure (Missouri Star Quilt Company), some fusible thread from Superior  called Charlotte's Fusible Web, a hard shelled credit card holder, some Bohin needles, and a hexie project - pieces and book - to make a jewel box necklace...The Superior booth was giving away Dr Bob's Thread Therapy discs and a catalog of all their threads..I also bought a hand dyed 3/4 length sleeve T-shirt...and a multicolored jacket...its so lightweight but its really warm! (that was an excellent salesperson..she was bound and determined I was not getting away!)
I am looking forward to trying the fusible thread...just to see if that works!

Monday, January 11, 2016

A New Toy for Me

...And I do mean 'toy'! I bought a Crayola Light-Up Tracing Pad and it is working out marvelously!


Thing weighs almost nothing and is battery operated. I need a light box for one of the classes at Road this year and though I have my light box that my Dad made for me when I was in college (it still works!), it's a bit heavy to lug around since it is a wooden box...this new light pad has LED lights, and a non-glare surface. Comes in pink or blue (clearly marketing to the sexes)...bought the blue since it promised earlier delivery.. And..the pink is a bit much...


May need to buy one for my DGD - she has a birthday coming up soon..

Sunday, January 03, 2016

Mandarin Duck and Other Projects

This is the Mandarin Duck, my project from a class with Jenny Bowker at Road to CA last year. It came home with most of the pieces temporarily fused onto a muslin backing..I hadn't added the eye..and there were a few places that had 'holes' where the alignment was a bit off...I  fixed those and then sat down to stitch the edges with MonoPoly...started out with my normal foot and quickly realized that I needed to switch to the Big Foot and do this more like FMQ...


As I was scooting around in my crowded work room after I trimmed up the Duck, I knocked a piece of fabric off a stack..when I picked it up off the floor, it begged to be used in the Mandarin Duck...I originally was going to add a flying geese border, but I love how this piece looks against the rich dark brown...

Then, I played with adding a bit of the rust from the Duck's sail...and that just made it sparkle!


So..the borders are on, I stitched three wool batting pieces (still left from the days when Hobbs was a vendor at Road and sold the squares for 50 cents), created a backing - just plain white muslin...and batted the piece - when it rains, we eat lunch in the cafeteria, and I get some quilting time in..and its predicted to rain all week!

Finished off the rest of the stitching on my Beast from the Beasts of the Jungle class from a couple of years ago - Kissy has been waiting patiently by my sewing machine..and so she is done..


And...since I am taking a hexie class at Road this year, I made a portable design wall / block carrier out of a pool noodle, the cardboard tube from a dry cleaning hanger for pants, a piece of fleece and a hair tie...this will help me carry my design home from the class since there is no way on earth will I get 50 hexies prepared AND stitched in 6 hours..I am fast..but not THAT fast!


I have to cut 70 squares of a single color family for these hexies - I picked green (no shock there, eh?) and so far have unearthed at least 90 different greens!! On to the cutting...I hope I end up with 70 that I can use!  I know some have to be tossed - the plaids, strange fabrics, flannel - but I pulled them anyway..just in case...

Saturday, January 02, 2016

Echos of the Grand Canyon

First finish of the new year:

I renamed the Drip quilt to  'Echos of the Grand Canyon' because..well, it reminds me of the Grand Canyon, in a vague sort of way.

It is long...it is thin...it has very many warts..but it is also DONE!!!
Started in January 2014 in a class with Katie Pasquini Masopust called 'Watercolor Painting to Quilt', it now qualifies as a quilt. (It's even labeled)

I couched various threads, yarns and fibers onto the seams of the applique. That was the most fun part  (besides painting the original) of this quilt - finding the embellishments! The border fabric is very strange..it's crispy (even after washing) and has an odd odor when the iron hits it (so its NOT quilting fabric)..But..it was the best piece in my stash for the borders..I had just enough to make the facing out of the same fabric - I just think facings look better when they match the front fabric.

Only place where I could hang it for its portrait and be able to the see the whole quilt to was the door at the end of the hallway!


more info on the quilt formerly known as the Drip quilt:
Around the World Blog Hop

and
Road to CA 2014

Friday, January 01, 2016

Happy New Year 2016!

Wishing you and yours a very Happy New Year.


Resolutions...well..not so good on those, but I will try to post more this year than last!

I am spending most of the day quilting ...a very good day so far!
Here is a peek at what I am working on:

Monday, December 28, 2015

Doodled Hexagons

I saw a series of posts on Jill Buckley's blog where she talks about her adventures in doodling and painting hexagons - I decided to try out this technique...using Inktense pencils and an ultra fine Sharpie on muslin...


(I will be adding the blue outer edge later...)

Here is my foray into this fascinating art form! (click on the link to go to the Photobucket album)
Doodled Hexagons


Couple of lessons learned:
 1. Wash the muslin before painting with water! Why this escaped me, I have no clue...the hexies shrank a wee bit...just enough to be annoying.

 2. Large blobs of water, when hit with an iron, make ghost shadows...blot before you iron, or wait til the piece dries... 

Over all, I like how my doodled hexagons turned out...and though its time-consuming, I could see doing this technique for a very special quilt...

Christmas 2015

Here is my annual rundown of projects I made for Christmas.


For the wee ones, I made butterflies (for the girls) and a dragonfly (for the boy):


For the older kids, I made chalk board rollups and included a pack of colored chalk:


For my DD and her honey, I made fleece pillows:


For Mama, I made two pillows that match the lap robe I made for her birthday:
For Daddy I made a plaid flannel throw:


For all of the families, I made button pictures - saw a similar idea on FB and had to try it out - my initial attempt was so well received that I just had to make them for everyone! They are made from my Granny's button stash...each one is different (and I still have oodles of buttons left!)


Thursday, July 02, 2015

Nesting Robin #1 - Chicks in Red Shoes

A few months ago, one of the ladies on the Quilting Forum issued a challenge - take an orphan block and make something with it by adding borders from scraps in our stash - she gave us a suggestion every month and what we did with the suggestion was up to us. Its called a Nesting Robin since it never gets mailed to someone else to work on..you do all of the work! Now..a Nesting Robin can get quite large, if you add as many rounds as there were suggestions...like I have said in earlier posts, I don't do many really large pieces - so instead of adding a whole border for each suggestion, I added just a side!

I found a  cute chicken panel in my stash that became the center of my Nesting Robin.
The first month was squares and rectangles..red and green checkerboard.

 I also did some ric-rac chicks (with red shoes) on the top and bottom of the panel ( click on the picture to make it larger to see them)

Second month was triangles - wonky triangle chicks

Third month was flora or fauna - yo-yo flowers

Fourth month was circles and ovals - appliqued chicks

Fifth month was 'If it has a name, its fair game' - that's the flying geese border

and Sixth month was Repeat something - which I repeated the yo-yo flowers from the third border in the corner stones. There were a couple of more months of suggestions, but my quilt was as large as I wanted, so I stopped!

Note: All the chicks have red shoes! And all of the buttons are from my Granny's stash except for the wee chick I bought at Rosie's Calico Cupboard on the Quilter's Run...she has red shoes too, courtesy of my Micron pen!

Finished off the binding on the Quilter's Run last weekend:

Tuscan Landscape

Many, many moons ago...I made the base for the Tuscan Landscape in a class at Road to CA with Martha Nordstrand...It went on a journey to visit the needles of some very talented quilters who also attend the Valley of the Sun Retreats..and finally made its way back home where it took me another year or so to finish off the embroidery and quilting and to decide on the border...

At last...here it is!


Quilters who contributed to this are Ami Krenzel, Kim Diggins and Kathi Eddy

Getting Back in the Saddle Again

Yikes..its been a VERY LONG DRY spell in these parts! Sorry for being absent so long.

I did attend Road to CA in January...took a couple of neat classes:

Tentmaker Work - I am almost done with this piece. It is going to be a pillow cover. This pic is how much I got done in the class...The class was taught by Egyptian Tent Makers..they are truly amazing applique-ers!


Images in Landscapes -
Loved this class but unfortunately, have not worked on this project very much since January. Class was in how to blowup a snapshot into a wall hanging sized quilt...which you then can add traditional blocks to make an interesting focal point..mine will not get too much bigger than this as I don't usually do very many 'big' quilts...but I am thinking of at least adding a border of flying geese..we will see how inspired I get! The small picture is the photo I started with and then enlarged...looks pretty darned close, eh?


Project Bag - This was a fun, quick bag class..I went to M&L a few weeks later and bought a yard of headliner fabric to make more of these. I think I even have enough of the clear plastic...just need time!


I did attend the annual Valley of the Sun Retreat in February:
One of the highlights was making this Mystery Quilt...I think EVERYONE loved the pattern and how their quilt came out! Still need to quilt it though...


And..just went on the annual So Cal Quilter's Run and stimulated the economy!


One of my additions is a Thread Director...supposed to help eliminate breakage when using metallic threads for FMQ...will have to play with that soon!