Pages

Monday, October 08, 2012

Southwest Trip

DH and I went on a driving trip for our anniversary this year. We toured the Southwest.We left really early on Saturday morning. By the time we got to Baker, it was daylight and lo and behold, the desert was GREEN due to some rain we had a week earlier.


Stayed in Nevada for a couple of days then headed to Arizona. We crossed over Hoover Dam. Though I have been there several times, its still awesome and huge!

Then on to the old Route 66, heading for New Mexico for the tour of  Spaceport America.

We stopped to change drivers in this wee little spot on the map - Grasshopper Junction - where I got a quick shot of this handsome fella!

Our major goal for the trip was to take a tour of the Spaceport America outside of Truth or Consequences, New Mexico.  The Spaceport has not quite opened for business but they allow a tour company access.

This is the highly polished glass windows of the terminal building. You can just see us reflected in the glass as I took the picture. (We are the couple on the left). On the lower floor is the waiting area for family and friends of the astronauts. On the top floor is the prep area for the astronauts  -  they come a few days ahead of time to get ready for the space shot. Behind the waiting area is the hanger which stores the spaceship and its launch vehicle.

This is looking at the hanger/terminal building from the operations center. Those dark panels are the doors to the hanger part.

This is out on the runway. Probably the ONLY time I will be on that runway...unless I should happen to run into a couple of spare millions and could sign up for one of the flights. (They start at $200,000! Lets see, that would be at least $400,000 for the both of us...um..not happening anytime soon! But we can dream!)

DH looking out of the top floor of the operations center. The white smear in the distance is the runway.

Here is the window he was looking out of from the other side!

This is an aerial shot (from a news service - not my picture!) showing the terminal/hanger building. The operations center is off to the left of this picture.

One of the other features interesting features near Truth or Consequences is Elephant Butte Dam. It was built before Hoover Dam and at the time, was the largest dam in the USA.

Elephant Butte Reservoir..the water level is way down due to the lack of rainfall.

We headed to White Sands after the Spaceport. One of the interesting sights was a two humped camel in a trailer - this is not the actual camel we saw, but it looks kinda like him..the camel looked like he was having the time of his life, rolling down the highway. I was driving or I would have snapped a picture.

This is the center at White Sands. I love the pueblo styling and the color.

A picture taken near White Sands.

This is the lake at the Inn of the Mountain Gods. We got there after dark and were hoping to stay there. Went up to the front desk to ask if they had a room and were told no, but that not all the guests had checked in yet - check back with them in an hour - maybe they would have a cancellation. So..in an hour, we went back up to the desk and a guy tapped DH on the shoulder. Said he had heard us inquire about a room when we were there an hour ago...and that he had one he was going to give up - he had asked for an adjoining set of rooms but what he got were rooms that were on opposite sides of the hall..he really didn't want his young daughter to stay across the hall! So they were going to get a rollaway for her and if we wanted, we could have the room! So...we got the room..thanks to an alert and generous guy.

Next morning we toured the lake and then headed for Roswell..and the famous alien landing!

Here I am looking at one of the tourist trap gift shops - this one has a depiction of the alien ship's crash landing, complete with flashing red lights. The McDonald's in Roswell is themed after the alien ship as well.

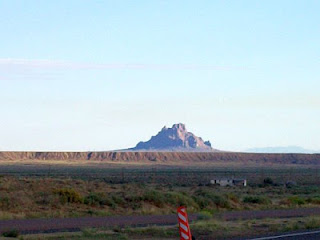
We drove up to Gallup next, with Four Corners and Monument Valley as the next destinations. This is Shiprock on the way to Four Corners.

Four Corners...with little booths all around in each of the four states - New Mexico, Arizona, Colorado and Utah..Since its on an Indian Reservation, the booths were staffed by Indians of various local tribes. Some of them were really interesting to listen to. We watched a lady that made sand paintings using rocks she ground up from her backyard. Turquoise for the blue, sulpher for the yellow, quartz for the white, coal for the black. She would paint a thin line of white glue on a tile, then shake some of the rock dust onto it and would make wonderful pictures. At the end she coats them with an acrylic to keep the sand set.
Another couple were making the most intricate carvings on clay pots. The wife used a sharp tool to inscribe the clay and he added the colors once it was fired. They really were wonderful (but really expensive!) The guy told us about a scenic way to get to Monument Valley - it was thru some really desolate areas.

The hills turned RED once we got into Utah. I couldn't stop to get one shot that I really wanted as the road turned into a completely red valley. It was so peaceful and quiet, and hardly any traffic. (Which could have been a bad thing (see the end of the post) but it turned out ok - our Guardian Angel was watching over us!)

Monument Valley.

Another view of Monument Valley.

After we left Monument Valley, we headed to Sedona. I had heard it was beautiful and the drive down into Sedona from Flagstaff was so gorgeous. This is Bell Mountain in Sedona. We decided not to stay in Sedona because of the cicadas...they made such a racket that I don't know if we would have slept! It sounded like some weird kind of motor, humming away at max volume! Some day we will come back and we plan on climbing Bell Mountain to see if there really is any truth to the stories of it being an energy vortex.

The hills were still red outside of Sedona.

The setting sun thru the clouds.

It was a good trip. The day after we got home, we went to start the car and OMG, the battery was dead. It had hiccupped a couple of times on the trip but always started the engine...So we put the charger on the battery and the next morning we headed for Sears to get the battery replaced (It was time anyway) Thank goodness we didn't get stuck out there in the middle of one of the nowheres we were in on the trip!

No Sew Pumpkin Tutorial

I made this cute fabric pumpkin today. its totally reusable, and its NO sew!

Ingredients:
1 fat quarter in pumpkin color
1 fat eighth in brown
4 inch or larger square of green
1 piece of floral wire
piece of green or brown double fold bias binding same length as the floral wire
1 cardboard TP tube(or TP roll)
batting scraps

Wind batting scraps very loosly around the TP tube..you can use a full roll of TP if you want. I think I used around 5 layers..you might only need 1 or 2 if you use the full roll. Place the fat quarter of pumpkin color face down. Center the TP tube and pull up the shorter sides of the fat quarter and make sure they tuck into the tube. Adjust batting if needed to allow it to tuck. Tuck the rest of the edges of the fat quarter into the tube, working your way around each side of the fat quarter. Roll the fat eighth of brown into tight roll to make the stem. Fold the green fabric into a leaf by folding diagonally, twice and hold it against the brown fabric. Stuff the stem and leaf into the tube. Center the floral wire inside of the bias binding and make curlicues out of the ends. Stuff the middle of the fabric covered wire into the tube. Voila...Pumpkin!

If you celebrate Halloween (my least favorite holiday)...you could make this into a jack-o-lantern by pinning on some black felt cutouts of eyes, nose and mouth.

Sunday, July 29, 2012

In the Butterfly Pavillion

This was where we ended up this morning:
The wildflower meadow is just one of the many areas at the Rancho Santa Ana Botanic Garden. Most of what we see flowering there seems to be 'farewell-to-springs' and in the back are 'Claremont Sunshine sunflowers'. The scent was heavenly!

They were releasing all of the butterflies in the Butterfly Pavillion today...everyone who entered the tent could release a butterfly into the outdoors! The kids in the tent were SOOO excited! (One little fellow was freaked out by a butterfly landing on his shoe.Poor thing!)

These all were taken inside of the Butterfly Pavillion:


And a freed butterfly!

A manzanita tree - one of the volunteers had us touch the bark - the bark is really cold, even though  the temperature was close to 90 degrees by the time we were in the Garden:


There were oddles of squirrels as well - the ticket taker lady said it was because the walnut trees were getting ripe. They don't stand still though so this one is in motion!


There is still lots more to see, so we will need to make a return trip!

Monday, May 21, 2012

The Quilt Inspector...


..is tired!!

Sunday, May 20, 2012

Sunflowers and Tea

January 2011 at Road to California I took Terry Waldron's class called 'Scavenger Hunt Art Quilt'. She sent a list of 'things' we should find around the house that might be incorporated into the quilt that would come out of the class.. Here is the list from her email:
THE SCAVENGER HUNT ART QUILT
with Terry Waldron

Using your BEST sense of humor “funny bone”, you have until the day BEFORE our class to find:

1  NEW ITEM THAT EXCITES YOU AND YOU WANT TO HAVE ON THIS QUILT
  (example:  a glorious bead, some specially dyed cloth or yarn, an antique doily, some alpaca hair or spun yarn,,,,)

1 ITEM THAT IS OR WAS ALIVE
(example:  a flower, a leaf, some tufts of grass, a nut or pod,
a silk worm cocoon, a unique scrap of paper, a natural fiber like silk, a piece of bark from a tree!!!)

1 ITEM THAT WAS THROWN AWAY BUT INTERESTS YOU
It will probably be some sort of paper item like some newspaper or a ticket or a sales slip or a napkin, but it could be a snipped scrap of fabric or ribbon from a present or a piece of sandpaper or… ?

1 PICTURE – BLACK & WHITE OR COLOR
This can be a photograph or a printed logo from a package or a picture from a newspaper or a design on a piece of cloth or a magazine page or something from your wallet.  (I am going to bring my copier for you to use to transfer this to cloth.  I will have fabric that is ready for copying.  It will cost $1 per sheet, or you can bring your own if you want to.)

1 ITEM THAT IS LONG AND WILL CREATE A LINE
(example:  string, yarn, wire, ribbon, torn paper or cloth.
 You could even fold twist-ties together to make a long line!)

Oh..the possibilities!!

My scavenged items that ended up on this quilt are an antique doily (it has a small hole in the center...), the fabrics that make up the sunflowers are decorator fabrics from a huge bag of scraps from the Fullerton Civic Light Opera, the green ribbon along the left side and the sunflower 'paper' that was wrapped around a pot of flowers that my son gave me when I was in the hospital... 

I knew going into the class that I was going to do 'something' that had sunflowers on it..It turned out to be a modern-ish tea table with a pot of cheery flowers..I know the perspective is not quite 'real' but..it is pleasing to me..and I hope..to you!

Here is what the quilt looked like the first day - the elements are just pinned onto a piece of batting over a foam core board:

The cup was odd..and the background swallowed up the pot..so I changed out those elements once I got home.
 
Here is what the quilt looked like after I stitched all of the elements down with Monopoly at Retreat:


And....here is the completed quilt...I quilted the leaves and the rays from the sunflowers with my Octi-hoops...and hand stitched on the buttons into the flower centers and added the tiny ladybug seeds.
Front: (click to view larger)


Back:

 
All the pieces were free-hand cut - even the borders. I fused the plastic-y sunflower paper from the pot of flowers to muslin - that became the saucer liner under the tea cup and the backing to the quotation on the reverse of the quilt. The tea bag tag was a piece of trim that the lady who was sharing my table cut off for me. The saying on the back was a quotation that Terry had us pick out to help our creative juices get flowing (hence the cup of tea!)...the two 'ladybug' seeds were in the packet of interesting 'stuff' she gave us at the start of the class..as were the pieces of yarn over the cup of tea, the stems for the sunflowers and the border of the flowerpot. The buttons were from my button collection. The backing fabric was a remnant that I found fascinating because of the scarab-like graphics.

All in all...a very satisfying class...Thanks, Terry!

Saturday, May 12, 2012

Presenting....Heart's Garden...is DONE!!

I took the last stitch this morning...

This was one of my oldest UFO's...in 2002, I took up quilting..in 2003, my Mom asked me if I would make quilts for both my Sis and me out of the scraps of fabric she saved from making clothes for me and my Sis when we were children. I finished my Sis's quilt in 2004..and started on mine..I had a grand notion of what I wanted to do for mine..I wanted to use up as much of the scraps as possible...so I started out with the big hearts..then the center bouquet...then the back blocks which started out as two strippy blocks, cut on the diagonal, rotated and stitched together. I used up most of the solid greens and the solid dark blue that became the sashings and the bindings -the light blue on the back came from the background fabric I used for my Sis's quilt...and then took a chunk of almost every fabric in the box and made the small hearts in the border and on the label. There are over 75 different fabrics in this quilt.

There are fabrics for dresses, several uniforms for Band, formals, swim suits, a bridesmaid's dress, shorts, blouses, a cape, Grand Bethel outfits, the dirndls we wore when our Grandmother took my Sis and me to Germany and even the fabric we used to slipcover the seats in my first car.

I had to learn to applique..the big hearts were prep-ed  by stitching on the line drawn on a piece of interfacing on top of the colored fabric, clipping and turning...by the time I did the hearts in the border a couple of months ago, I am a much better applique-er and did the small hearts with glue stick prep and the leaves by needle-turn.

I had to learn to free motion quilt...the hearts are echo quilted, and the setting triangles have a V shape with a heart-flower coming up from the center of the V...the V was done by ironing a piece of freezer paper onto the white fabric, then stitching along the edge. There is a flower stitched into the center of all of the large hearts.

I wanted a two sided quilt..so..I had to learn to make a Quilt As You Go quilt..this sounds easier than it is..because once the two halves of the quilt are together (the first couple of rows are a piece of cake!), the quilt gets VERY HEAVY! The two longest seams I ended up taking out multiple times..the lower one I took out three times before it lined up.. All of the green sashing is hand stitched down along the folded edge..

I used the same technique as the joining strips for the binding..the blue fabric is folded under the green and I did an invisible stitch along the folded edge of the green binding strips..

Pieces of this quilt went with me to the Arizona Retreats each year...I stitched the big hearts while my DH was in rehearsal for a play...


Here is the front side of the quilt: (click to make the picture bigger)


Here is the back side of the quilt:(click to make the picture bigger)


And the label:
My Mom wrote a poem for the label...and we collected up a few pictures of me, my Sis and my Mom wearing dresses made from materials included in the quilt.


And..as much fabric as I used up with this quilt...there are still TWO large boxes of fabric left!! (I think scraps breed when they are left in a box in the dark...LOL)

Sunday, April 22, 2012

Locust Tree Blooms and a Solution to the Bobbin Winder Issue

We made kind of a mistake planting a locust tree in the yard many years ago..it has spread from the original tree (which died after about 15 years) to three clumps of shoots - it's a rather invasive tree..but..they provide some lovely blooms in the spring time...


My Tiger cat under the locust tree:


I got an email from one of the ladies on the TreadleOn list, Cindy, saying that if I took the top screw out of the bobbin winder it could move down into contact with the wheel..only downside is that one has to hold the bobbin winder down whilst winding..but not a big deal..may still look for something to make the bobbin tire and the wheel match up a bit better some day...but it's not a priority...Here is a shot of the bobbin winder without the top screw..Oh..and you can see the orange spool protector in this shot as well!!

Saturday, April 21, 2012

Playing with Alis

I finally got to sewing with Alis, the Singer 99 that I converted to a hand crank back in February. I am really liking hand cranking!

 First, I made her a felt spool protector out of bright orange felt (you can't see it in the pic since there is a spool on it!) Then I oiled her up, cleaned out the hook area, threaded her up and started cranking...had to do a few tweaks to the presser foot pressure and the tension knob, but I have her sewing a pretty nice stitch - the stitch length knob is still frozen but that is not dreadfully necessary yet - I did oil it and hopefully it will loosen soon.

I took the knee-bar controller out..took me a few to figure out there were screws on the bottom of the case! And one screw needed some 'manly muscles' so I got DH to at least start that one...Machine is significantly lighter with both the motor and the controller removed.. I bagged the pieces..just not quite sure what to do with them!


I am noodling with whether I can move the hinges on the case..but not sure on that since there are two holes for the screws that come up from the underside that would need to be filled and re-drilled...it's just a wee bit off for leaving the hand crank in place and putting the dome case over it (maybe 1/4 inch!!)..I can SEE there should be room to move it..but just dunno about the mechanics of it..for now, I am just leaving the bolt tightener tool in the underside of the case...and taking the crank off to cover the machine...


Need to figure out how to get the bobbin winder to work with the spoked hand wheel..am thinking about adding something to where the bobbin tire should meet up with the wheel...thought maybe a piece of
treadle belt would work, but it's a wee bit too thin..need to go to the hardware store or the craft store to see if I can come up with something that might work..

Oh..guess who helped: