Pages

Friday, June 30, 2006

Tuppence, Tuppence, Tuppence a Quilt

Progress as of Friday:
Photobucket - Video and Image Hosting


This is part of day nine's treatment. I made the feather stitching into seaweed and then I needed some fishies. Found two oval buttons and drew the fish features with a permanent marker and added some stitched fins and tails:
Photobucket - Video and Image Hosting


The sunflower is part of day nine's treatment. The coin is a real tuppence sewn on in shi-sha style, which after a bit of googling, turns out is a Hindi word meaning 'little glass' and refers to the method used to embroider mirrors onto items and is a common theme in India. The method works for any flat round item. The instructions for this are on Annie's blog for day ten.
I added the row of blue beads since I needed something fairly skinny on this seam since the motifs take up so much of the adjoining pieces:
Photobucket - Video and Image Hosting

This is day eleven's treatment. I used buttons instead of beads:Photobucket - Video and Image Hosting

I am getting down to the home stretch on this piece...I only have a few more spots where I can easily put in more stitching.

Thursday, June 29, 2006

Crazy, Quilt...Crazy

Progress as of Thursday:
Photobucket - Video and Image Hosting


Redid the fans from day two...Wasn't happy with the originals...I know I did them wrong. Thankfully Debra did some really detailed pictures on her blog that showed exactly how to do them...and I finally 'got it'. Much happier with them now. Frog-stitching on velvet is something you want to avoid if possible. The velvet does not want to give up on the thread!
Photobucket - Video and Image Hosting

Day nine's treatment. I did not have any flowery looking braid so I made do with this gold flat braid:
Photobucket - Video and Image Hosting


Day ten's treatment. I am running out of two sided seams to do treatments on, so I did all of it on one side...a bit crowded, but I think it works ok. I have one two sided seam left but its too near the fans to do these half wagon wheels - its the same stitch:
Photobucket - Video and Image Hosting

Wednesday, June 28, 2006

Crazy Quilts Are Heavy!

Here's the progress as of Wednesday - with all the buttons and beads it's getting quite heavy!
Photobucket - Video and Image Hosting

This is the other half of day three's treatments - I used a very shiny red thread between the green leaves - it does not show up as well in the picture as I would like:
Photobucket - Video and Image Hosting

This is day six's butterfly... I need lots more practice with the long/short stitching...
Lessons learned on this one:
1. Don't try this on fuzzy velvet if you don't have infinite patience...
2. This stitch REALLY needs a hoop...
3. Plan these kinds of treatments before you put beads on the piece...Beads make the hoop not work....
4. If your chunk of fabric is stretchy and its already lumpy, putting this kind of treatment on it does NOT improve the lumpys...Especially if you can't get it hooped.
Not the best looking butterfly, but its as done as its going to get at this point!
Photobucket - Video and Image Hosting

This is day seven's treatment. I started out with a much more contrasting lacing, but could not get it to the backside with the needles I had on hand last night. Did not bead it - don't have enough small ones that are alike. May bead later if I find some beads that look right. This also looks better in real life:
Photobucket - Video and Image Hosting

This is the remaining part of day two...At least on the top of the teeny tiny gold rickrack I finally found. The gold thread would NOT go thru the tan velvet - it kept shredding and breaking so I went with something else on the bottom half.
The button is the treatment for day eight...
Photobucket - Video and Image Hosting

Monday, June 26, 2006

More Crazy Stuff

My Mom sent over a bunch of really cool trims...several have found there way onto the block already...

Here's the quilt block as of Monday:
Photobucket - Video and Image Hosting

Detail of first day's treatment -its way to close together, but its staying that way! And some of the cool picot tatted laces:
Photobucket - Video and Image Hosting

Detail of day five's treatment:
Photobucket - Video and Image Hosting

Detail of day four's treatment: the lacing drove me crazy until I saw the picture on sharon b's site - that cleared it all up!
Photobucket - Video and Image Hosting

Detail of Picot Tatted Lace- this may get the second half of day three's treatments:
Photobucket - Video and Image Hosting

Detail of gold mesh flower (the background actually is a light pink) - Idea came from Annie's Crazy World, who is doing a 100 Days of CQ Details too! I'm not sure I like the green leaves, may take them off and try something else. They are my first attempt at embroidering with ribbon...kinda wonky :
Photobucket - Video and Image Hosting
Detail of half of day three's treatments:
Photobucket - Video and Image Hosting

Sunday, June 25, 2006

This is a Crazy Month!

Here is some progress on my Journal Page for June..Its not done by a long shot...But its turning out to be a blast. I decided to do a Crazy Quilt block...It's something I have wanted to do for a long time and this month seems just crazy enough!

One of the Crazy Quilters in the blogosphere - sharon b - is doing a series in her blog on a 100 Details For 100 Days Her site is a veritable treasure trove! I am kinda 'playing along' but I will run out of seams long before the series is done... Unless....I MAKE MORE CQ BLOCKS! Allison was the one who pointed me to this series...I am grateful! Her Crazy Quilts are a treat to look at! She is going to be following along with the series too.

This is the naked Crazy Quilt block, made out of mostly velvet with a chunk of silk in the middle. These scraps came from the stash I acquired from my Granny. She did lots of charity quilting and people would give her bags and boxes of fabric - she saved the 'fancy stuff' into a separate box:


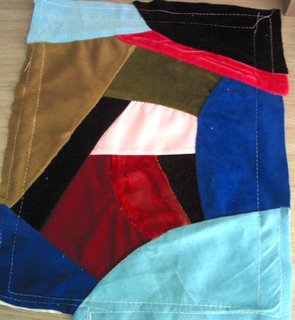
The innermost white stiching is the outer edge of the size for the Journal Quilts. I plan on making a pillow style backing (with the two overlapping pieces of backing), slipping the Timtex stiffening piece in thru that and buttoning on a piece of fabric with the normal stuff I put on the back. That way I can take it apart if needed...

When I finished the naked block I said to myself "I don't think I particularly like this style of quilting"...But then I started in on the seam treatments and that is FUN FUN FUN!

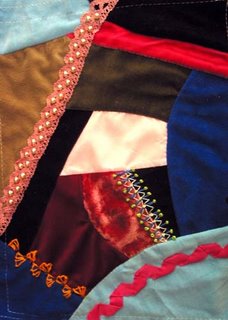
Here is my progress on decorating the seams as of Sunday AM:
I attempted the first day's treatment (the seam with the green French knots) - I got it just a wee bit cramped so I didn't get all the elements in but I think it looks ok...I did the second day's treatment (the orange and purple seam)... The pink ribbon on the blue piece at the bottom is my attempt to make something like rickrack, which is the basis for day two's second treatment...Which I haven't started. I put in a call to my mom to see if she has any - if she does, I may take my ribbon attempt off - or not! I still have day three, day four and now day five to do!


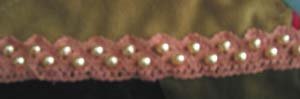
This is one of the detail seams - its hand made lace with the beads from a necklace that the clasp came off years ago and has been sitting in a baggie in the kitchen drawer waiting for me to fix it...I 'fixed it' alright, eh? (my camera is not taking very good closeup shots...I think there is another setting I need to use...gotta get the book out and read up on close shots - Hopefully will get better pictures as this progresses.)


I went on a hunt for beads and buttons that I could use for embellishment and found I DO have a few hanging around. I found another dead necklace that has some nice maroon beads, some wooden beads, a few bugles, a few beads that are a bit larger than seed beeds, even a few little metal feathers! And the piece-de-resistance...Some milliflore beads I think my daughter made out of Fimo years ago... I dumped out my button collection and separated out all the 'interesting' buttons. We'll see if any of them make the cut to actually get places on my block.

Sunday, June 11, 2006

Three Coins in my Coin Purse

My favorite coin purse... I got it as a gift from a friend probably close to 20 years ago. Its been in nearly daily use since then...I love how it fits into my pocket at work so I don't have to drag my full purse down to the cafeteria. Anyway, since its been around that long, it got a wee bit worn. I patched it up a couple of times by sewing fabric to the inside, but as you can see, it was on its very last legs as the leather is crumbling:
Photobucket - Video and Image Hosting


I have searched for a coin purse like this one every place I go that has leather goods - but have never found anything close. Nothing to do but take it apart to use it as a pattern to make a new one. Here it is in pieces after I spent some time with it and my handy dandy frog-stitcher:
Photobucket - Video and Image Hosting


Here are the supplies I purchased over a year ago (I've known this day was coming for a long time!). A new zipper, some snaps, upholstery thread, BIG needles and of course, some leather!
Photobucket - Video and Image Hosting


Sewing leather is a gas. Not the same as fabric at all - it sticks to the bed of the sewing machine and if you start too close to the edge, the leather disappears into the bobbin area and pulls the needle plate up (mine is held in place with magnets...) - you have to start far enough for the feet to get a good grip! And...pinning is not easy - I ended up holding the final pieces together with safety pins! After a few hours, I now have a NEW version...Photobucket - Video and Image Hosting

Not quite the same...the old one is floppier where this one still is stiff...but I expect after a few months it will probably soften up!

I may try making one in ultrasuede as that might be a little easier to sew.

Saturday, June 10, 2006

May Journal Quilt Challenge - Raccoon Finds A Home

Here is May's Journal Quilt Challenge (A bit late, but better than never!).

Photobucket - Video and Image Hosting


Photobucket - Video and Image Hosting


Text from back:

This month I am exploring the wonder of helping Nature.

One of the highlights of May 2006 was participating in a rescued raccoon release. My friend Donna brought five feisty, bright-eyed, fat and sassy raccoons from the raccoon rescue preserve and we released them in the Santa Ana Riverbed. It felt good to be of a small help to our wild friends.


Construction:
The central picture for this month’s piece was an original drawing of a baby raccoon that I did in 1980. The original piece is a bit smaller so I used the enlarge function on my copier and made it the right size for the journal pages.

The raccoon is colored using All Purpose Inks from Tsukineko. Two borders were sewn around the central piece and then fused to the interfacing. Quilting was done around the raccoon and the tree branch.
The back was printed and fused to the interfacing. The outer border was wrapped around the edges and stitched to the back.

Thursday, June 08, 2006

Chemistry Lessons for the Fiber Artist - Part Deux

Last Saturday we went for another Fabric Dyeing class - this time for a 12 step Rainbow.

We each picked a red, a blue and a yellow - Mine were Cherry Red, Electric Blue and Lemon Yellow. Then after weighing the fabric, the instructor printed out a recipe for mixing the colors to get Yellow, Yellow Orange, Orange, Red Orange, Red, Violet, Purple, Blue, Indigo,Teal, Green and Yellow Green. We carefully mixed the required amounts into the glass jars and added salt water, the scrunched up muslin and closed the lids. This time I wanted some mottling to occur so I did not shake the jars too much. Every 15 minutes we turned the jars over. Here are my rainbow fabrics 'cooking':

Photobucket - Video and Image Hosting

After an hour and half of turning, we added soda ash water and did another hour of turning. Some of the ladies brought knitting to keep busy and some played Soduku...After soaking in the soda ash, it was time to rinse:

Photobucket - Video and Image Hosting

It was taking a long time to get each person's 12 pieces rinsed out so I decided to just take mine home and do the rinsing there. Here are my pieces packed up to go home - they are in seperate zipper bags to keep the dyes from bleeding into the other pieces which happens until the excess dye is rinsed out:

Photobucket - Video and Image Hosting

After rinsing, and removing the extra dye with Synthrapol and hot water, these are my pretty pieces of fabric.

Photobucket - Video and Image Hosting

I am MUCH happier with these than the black graduated series, though that was an interesting experiment. My violet and purple did not come out right, and the oranges are too close..If you have done hand dyeing, you will immediately recognize what went wrong by looking at my red piece. For those who haven't done dyeing - the red has little spots of darker color where the dye did not completely disolve before I distributed it in the glass jars - which means I did not mix it enough. But, I like the steely blue that I got instead of purple and the brownish color instead of the violet is interesting too. And I love the red piece with its darker dots! (I want to try sprinkling dry dye on wet pieces to see what happens!) Overall, I am really happy with the results!

Next lesson is in painting with fabric dye - I am anxious to try dye painting with the thickener.

Sunday, May 21, 2006

The Great Raccoon Release

Today was the perfect day for releasing rescued raccoons into the wild...not too hot, a bit overcast and with a mild breeze. My friend went to the rescue preserve and they wrangled 5 fiesty, bright eyed, fat and sassy raccoons, gave them antibiotic shots and stuffed them into an extra large dog crate. She drove out to my house. The raccoons were trying to escape the dog crate - making lots of racket and rocking the cage wildly.
Photobucket - Video and Image Hosting
She picked up my DH and me and we headed for the release site in the Santa Ana Riverbed Wilderness Area.
Photobucket - Video and Image Hosting
Five raccoons in a dog crate weigh more than 150 pounds...quite a bit of a load to haul. Where we parked is a staging area for horses and a couple of caballeros offered to help my DH with hauling the crate with the raccoons and the bags of dog food (to help the raccoons adjust to their new home) Even with three strong men, they had to stop frequently and readjust their hold on the cage.
Photobucket - Video and Image Hosting
We got down close to the river and opened the cage. The raccoons were a bit reluctant to vacate the dog crate! Finally a couple of them headed out and made a beeline for the water.
Photobucket - Video and Image Hosting
We ended up taking the crate apart to get the final three raccoons out. One jumped out and ran under the top of the crate (Gimme shelter!) Finally all the raccoons were out and had headed to the water.
Photobucket - Video and Image Hosting
I see WATER!
Photobucket - Video and Image Hosting
One even looked like he was going to swim to the other side of the river but he noticed his buddies had stopped at a neat looking tree with a cave under the roots and swam over there instead.
Photobucket - Video and Image Hosting
I hope they have a good long raccoon life!
Photobucket - Video and Image Hosting
Home Sweet Raccoon Home!

Sunday, April 30, 2006

Color and Composition - Week One

My Still Life:
Photobucket - Video and Image Hosting


Here are my blind contour studies of the still life:
First pass with no peeking
Photobucket - Video and Image Hosting


Second pass with some peeking
Photobucket - Video and Image Hosting


Third pass looking at still life but not at the page
Photobucket - Video and Image Hosting


I still have to do the exercises for contour cutting and contour stitching. I did get a bunch of fabrics out of my stash and only have to get a few for the color wheel - mostly the grays - I found I had a very nice medium gray, but the inbetween ones are not quite there. I may try to dye the grays with the Tsukeniko inks if I cannot find them at the store on the way home tomorrow. I did find a few in the printed side, but need a couple more there too.

April Journal Quilt Challenge - The Promise

April's Journal Quilt Challenge:
This is the pencil study I did for the piece on Palm Sunday, 2006
Photobucket - Video and Image Hosting


Front of Journal Page
Photobucket - Video and Image Hosting


Photobucket - Video and Image Hosting
Text of Back:
This month I am exploring the wonder of God’s Promise
Palm Sunday, 2003. My son was playing the part of Jesus in a Passion Play. The church where this play was being performed was a longish drive from our house. That Sunday morning was drippy and rainy, much like this year’s Palm Sunday. The gray clouds were low and thick with moisture. Since it had rained off and on for the previous couple of weeks, the hills were all green and yellow with a coating of wild mustard plants. On the way to the church early that morning, my husband and I saw the most amazing sight – the clouds parted just a bit and a gorgeous rainbow lit up the ground underneath the break in the clouds. It just seemed so appropriate for us traveling to see a Passion Play to witness such a bright symbol of God’s Promise. I drank in the sight, made a quick sketch on the back of a prescription form and said – “This needs to be a quilt” and I gave it the name of ‘The Promise”, but I had only been quilting for a few months at that point, so I did not know how to approach a landscape quilt. This year, the day before Palm Sunday, I reorganized my sewing supplies into my new sewing room and one of the things I came across in the cleanup process was this scrap of paper with my quick sketch and that became the basis for this month’s piece.

Construction:
Design elements were fused onto the interfacing. I wanted to make ‘thread bunnies’ to represent the trees along the edges of the hills, but ran out of green thread before I could get the machine to do what I wanted. So it ended up being fuzzy yarn stitched to the contours of the hills instead.
The rainbow was trimmed from a piece of material with the rainbow colors but not in the right order so they are little skinny strips of color. The cloud material was purchased at a quilt shop where I safely holed up for a few hours because of a flash flood.
Satin stitching around all the edges of the page completes the construction process.
The rainbow picture above was taken by my daughter Clare.

Thursday, April 20, 2006

Chemistry Lessons for the Fiber Artist

Last Saturday, a bunch of my friends and I got together at a quilting shop and took an 8 step graduation fabric dyeing class. I picked Black, expecting to get a nice progression of grays...I was planning on using it for the black to grays needed for the Color and Composition Class that I am taking on the Quilt Studio forum...sigh...the best laid plans of mice and men...don't necessarily work when playing with chemicals!

Image hosting by Photobucket
Dye is mixed with warm water and salt in a carafe.

Image hosting by Photobucket
Here I am adding the dye to the first Mason jar. The fabric is added and then the lid is screwed down.

Image hosting by Photobucket
Every 15 minutes we shook the jars. Instructor Russ said to be careful of any dyes that have blue in them...Too vigorous with the shaking, and you get an explosion! I was careful (black has ALL colors, including blue in it!)

Image hosting by Photobucket
My friend Julia picked a much better color for progression! A nice yellow. The other colors that the class participants picked were kelly green, violet, red and peach.


Image hosting by Photobucket
Julia's first piece, rinsed out by the instructor, Russ.

Image hosting by Photobucket Image hosting by Photobucket
My results, after washout with Synthrapol and 6 rinses and a full wash with detergent...
Not at all what I expected! I scanned them on top of some real black fabric for contrast. Some of the pieces look olive green, some rather brown and only the last of the eight pieces is grayish. If you are quick, and count the pieces you will see there are actually 9 pieces - the last one in the series was dumped into the leftover dye in a measuring cup...which made it rather mottled. The WOW pieces fared even worse - I have a hard time telling that they any different in shade until I get to the last one....and again the bottom piece was in the measuring cup...

Though my dyed fabric is not what I expected, it WAS loads of fun doing the class. We are going to try the Rainbow progression in a few weeks...that should be way prettier!