
Monday, January 25, 2016
Hexie Daisy Progress
Finished the prep work for the Hexie Daisy block...now on to stitching them all together!

Sunday, January 24, 2016
Road To California Hexie Daisy Class
I don't usually get pictures of me at Road to CA...but this class had several!
Here I am stitching my center flower - almost done so we can show how to stuff the center of the Hexie Daisy
 Teacher Cheryl See is the other lady in teal...
 Showing how I do the back stitch join...

Here I am stitching my center flower - almost done so we can show how to stuff the center of the Hexie Daisy


Road To California Report
Fisrt, some eye candy:
Road To CA Quilts


Road To CA Quilts
Wednesday, I took two classes on the Brother Scan N Cut...the first one, we unpacked a brand new machine...learned to read the menus, created a card, and cut a purple heart out of fabric (we all went home with purple hearts!)....the second, we learned to pair a Brother Dream Machine embroidery machine with the Scan N Cut..cut the appliques and watched the Dream Machine stitch...
I was less than thrilled with the embroidery machine aspect - not my cuppa tea...but the Scan N Cut...now..the lady packing the boxes after the class I told her she was just gonna have to wipe my drool off it (she laughed) - I loved it!...My friend who was in the class with me bought her Scan N Cut..but whoo doggie, she spent a pile 'o cash! Even with the show special of 20% off, it still was almost $1K to get the machine and all the optional geegaws that go with it...

I made my embroidered piece into a mug rug...

I like the back almost as much as the front:

This is a picture of the Brother Dream Machine stitching out placement markers - it tells you where to stick the applique pieces on that you cut with the Scan N Cut

And then it tacks the pieces down and satin stitches them...automatic thread loading, cutting - practically does the whole thing for you! And..no thread tails on the front of the piece - not quite sure HOW it made all of them go to the back ...probably magic...
The machine I was using kept un-threading its needle...so though its automatic, it was a bit frustrating to have to re-thread the machine...
Friday, I took a 'thread sketching' class from Shannon Shirley..utterly fantastic class...I was able to get my entire quilt DONE..not just the stitching/quilting, but the binding, stitching the back of the binding down AND dissolving off the washaway that we used to 'transfer' the design from the pattern to the fabric...
First, we traced the pattern onto dissolvable film using a Sharpie pen:

My hands have some kind of grease that makes the Sharpie pen marks rub off the dissolvable film...the teacher let me borrow a pair of Graberoos - they are kinda like Machingers, but purple (so they don't get as groody-looking as the white ones) - and they don't make my hands hot! That solved the problem so I have a pair on order from Amazon...tried to find them in the vendor mall, but couldn't locate a pair...
I learned a new binding join technique that is fast, accurate and non-frustrating..and it requires no measuring or pins (whoohoo)
Here my finished piece:

I LOVE, LOVE, LOVE that it is finished! G thinks it could use some color..so maybe I will attack it with the Inktense pencils...have to try coloring the pattern first though to see if I even like the effect...
Saturday I took two classes...one on hexies from Cheryl See, who won the Best Use Of Color for her Starlette hexie quilt at last year's Road...and the other was a Zentangle pincushion class put on by the Janome dealer...
The hexie class was very interesting. She had us cut at least 70 two inch squares of a color family from our stash..mine is GREEN of course! (If you know me, you know I love green!) I actually had 82 green scraps without cutting any of my yardage or fat quarters...
There were only 8 students, so we got very individualized attention from Cheryl....we arranged those scraps in a watercolor format on our quilt scrolls - I made mine using a pool noodle, a piece of fleece, the cardboard tube from a dry cleaning pants hanger and two hair scrunchies...after I got fabric on the fleece, I regretfully realized that the back side of fleece is equally sticky..Yikes! So, right now I have a large plastic bag inserted into the roll to keep the wee pieces of fabric stuck to one side of the scroll...I will have to back the piece of fleece with something ...maybe one of the home dec fabrics would work...

Here is my hexie daisy block on the scroll:

and here is the hexies I got done in class - the center round is stuffed - the petals have to wait until the surrounding hexies are stitched on to be stuffed..

Learned lots from the Hexpert! We traded stitching techniques and I showed her the doodled hexagons...She had never seen the 'back stitching' method nor doodled hexies...
The Zentangle pincushion is cute...I like how mine turned out but the relaxing part of the whole Zentangle experience was out the window! We stitched on a piece of fabric that was prepared using Terial Magic so you don't need stabilizer..it was kinda fun picking the patterns on the Janome machine..and it is another COMPLETED project..so there is that - but it was a bit stressful not knowing exactly how big the patterns were going to come out (the machine does give you a hint, but I was so unfamiliar with the machine that it didn't register til almost the last line I stitched)
So..the hexie daisy block is my ONLY UFO this time..pretty darn great!
I did not buy too many things at Road this year...

10 zippers in assorted colors - they were only 50 cents each! The wee and very sharp scissors - the blade guard is attached so it cannot get lost, a very cute snail tape measure (Missouri Star Quilt Company), some fusible thread from Superior called Charlotte's Fusible Web, a hard shelled credit card holder, some Bohin needles, and a hexie project - pieces and book - to make a jewel box necklace...The Superior booth was giving away Dr Bob's Thread Therapy discs and a catalog of all their threads..I also bought a hand dyed 3/4 length sleeve T-shirt...and a multicolored jacket...its so lightweight but its really warm! (that was an excellent salesperson..she was bound and determined I was not getting away!)
I am looking forward to trying the fusible thread...just to see if that works!
Monday, January 11, 2016
A New Toy for Me
...And I do mean 'toy'! I bought a Crayola Light-Up Tracing Pad and it is working out marvelously!


Thing weighs almost nothing and is battery operated. I need a light box for one of the classes at Road this year and though I have my light box that my Dad made for me when I was in college (it still works!), it's a bit heavy to lug around since it is a wooden box...this new light pad has LED lights, and a non-glare surface. Comes in pink or blue (clearly marketing to the sexes)...bought the blue since it promised earlier delivery.. And..the pink is a bit much...
May need to buy one for my DGD - she has a birthday coming up soon..
May need to buy one for my DGD - she has a birthday coming up soon..
Sunday, January 03, 2016
Mandarin Duck and Other Projects
This is the Mandarin Duck, my project from a class with Jenny Bowker at Road to CA last year. It came home with most of the pieces temporarily fused onto a muslin backing..I hadn't added the eye..and there were a few places that had 'holes' where the alignment was a bit off...I fixed those and then sat down to stitch the edges with MonoPoly...started out with my normal foot and quickly realized that I needed to switch to the Big Foot and do this more like FMQ...

As I was scooting around in my crowded work room after I trimmed up the Duck, I knocked a piece of fabric off a stack..when I picked it up off the floor, it begged to be used in the Mandarin Duck...I originally was going to add a flying geese border, but I love how this piece looks against the rich dark brown...
Then, I played with adding a bit of the rust from the Duck's sail...and that just made it sparkle!

So..the borders are on, I stitched three wool batting pieces (still left from the days when Hobbs was a vendor at Road and sold the squares for 50 cents), created a backing - just plain white muslin...and batted the piece - when it rains, we eat lunch in the cafeteria, and I get some quilting time in..and its predicted to rain all week!
Finished off the rest of the stitching on my Beast from the Beasts of the Jungle class from a couple of years ago - Kissy has been waiting patiently by my sewing machine..and so she is done..

And...since I am taking a hexie class at Road this year, I made a portable design wall / block carrier out of a pool noodle, the cardboard tube from a dry cleaning hanger for pants, a piece of fleece and a hair tie...this will help me carry my design home from the class since there is no way on earth will I get 50 hexies prepared AND stitched in 6 hours..I am fast..but not THAT fast!

 I have to cut 70 squares of a single color family for these hexies - I picked green (no shock there, eh?) and so far have unearthed at least 90 different greens!! On to the cutting...I hope I end up with 70 that I can use! I know some have to be tossed - the plaids, strange fabrics, flannel - but I pulled them anyway..just in case...

As I was scooting around in my crowded work room after I trimmed up the Duck, I knocked a piece of fabric off a stack..when I picked it up off the floor, it begged to be used in the Mandarin Duck...I originally was going to add a flying geese border, but I love how this piece looks against the rich dark brown...
Then, I played with adding a bit of the rust from the Duck's sail...and that just made it sparkle!

Finished off the rest of the stitching on my Beast from the Beasts of the Jungle class from a couple of years ago - Kissy has been waiting patiently by my sewing machine..and so she is done..

And...since I am taking a hexie class at Road this year, I made a portable design wall / block carrier out of a pool noodle, the cardboard tube from a dry cleaning hanger for pants, a piece of fleece and a hair tie...this will help me carry my design home from the class since there is no way on earth will I get 50 hexies prepared AND stitched in 6 hours..I am fast..but not THAT fast!


Saturday, January 02, 2016
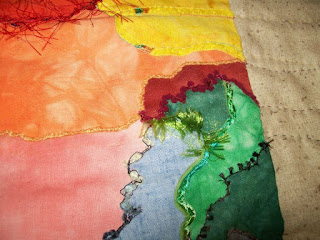
Echos of the Grand Canyon
First finish of the new year:

I renamed the Drip quilt to 'Echos of the Grand Canyon' because..well, it reminds me of the Grand Canyon, in a vague sort of way.
It is long...it is thin...it has very many warts..but it is also DONE!!!
Started in January 2014 in a class with Katie Pasquini Masopust called 'Watercolor Painting to Quilt', it now qualifies as a quilt. (It's even labeled)
I couched various threads, yarns and fibers onto the seams of the applique. That was the most fun part (besides painting the original) of this quilt - finding the embellishments! The border fabric is very strange..it's crispy (even after washing) and has an odd odor when the iron hits it (so its NOT quilting fabric)..But..it was the best piece in my stash for the borders..I had just enough to make the facing out of the same fabric - I just think facings look better when they match the front fabric.
Only place where I could hang it for its portrait and be able to the see the whole quilt to was the door at the end of the hallway!

more info on the quilt formerly known as the Drip quilt:
Around the World Blog Hop
and
Road to CA 2014
Friday, January 01, 2016
Happy New Year 2016!
Wishing you and yours a very Happy New Year.

Resolutions...well..not so good on those, but I will try to post more this year than last!
I am spending most of the day quilting ...a very good day so far!
Here is a peek at what I am working on:

Resolutions...well..not so good on those, but I will try to post more this year than last!
I am spending most of the day quilting ...a very good day so far!
Here is a peek at what I am working on:

Monday, December 28, 2015
Doodled Hexagons
I saw a series of posts on Jill Buckley's blog where she talks about her adventures in doodling and painting hexagons - I decided to try out this technique...using Inktense pencils and an ultra fine Sharpie on muslin...

(I will be adding the blue outer edge later...)
Here is my foray into this fascinating art form! (click on the link to go to the Photobucket album)
Doodled Hexagons
Couple of lessons learned:
1. Wash the muslin before painting with water! Why this escaped me, I have no clue...the hexies shrank a wee bit...just enough to be annoying.
2. Large blobs of water, when hit with an iron, make ghost shadows...blot before you iron, or wait til the piece dries...
Over all, I like how my doodled hexagons turned out...and though its time-consuming, I could see doing this technique for a very special quilt...
Christmas 2015
Here is my annual rundown of projects I made for Christmas.
For the wee ones, I made butterflies (for the girls) and a dragonfly (for the boy):

For the older kids, I made chalk board rollups and included a pack of colored chalk:

For my DD and her honey, I made fleece pillows:

For Mama, I made two pillows that match the lap robe I made for her birthday:
For Daddy I made a plaid flannel throw:

For all of the families, I made button pictures - saw a similar idea on FB and had to try it out - my initial attempt was so well received that I just had to make them for everyone! They are made from my Granny's button stash...each one is different (and I still have oodles of buttons left!)

Thursday, July 02, 2015
Nesting Robin #1 - Chicks in Red Shoes
A few months ago, one of the ladies on the Quilting Forum issued a challenge - take an orphan block and make something with it by adding borders from scraps in our stash - she gave us a suggestion every month and what we did with the suggestion was up to us. Its called a Nesting Robin since it never gets mailed to someone else to work on..you do all of the work! Now..a Nesting Robin can get quite large, if you add as many rounds as there were suggestions...like I have said in earlier posts, I don't do many really large pieces - so instead of adding a whole border for each suggestion, I added just a side!
I found a cute chicken panel in my stash that became the center of my Nesting Robin.
The first month was squares and rectangles..red and green checkerboard.
I also did some ric-rac chicks (with red shoes) on the top and bottom of the panel ( click on the picture to make it larger to see them)
Second month was triangles - wonky triangle chicks
Third month was flora or fauna - yo-yo flowers
Fourth month was circles and ovals - appliqued chicks
Fifth month was 'If it has a name, its fair game' - that's the flying geese border
and Sixth month was Repeat something - which I repeated the yo-yo flowers from the third border in the corner stones. There were a couple of more months of suggestions, but my quilt was as large as I wanted, so I stopped!
Note: All the chicks have red shoes! And all of the buttons are from my Granny's stash except for the wee chick I bought at Rosie's Calico Cupboard on the Quilter's Run...she has red shoes too, courtesy of my Micron pen!
Finished off the binding on the Quilter's Run last weekend:

Tuscan Landscape
Many, many moons ago...I made the base for the Tuscan Landscape in a class at Road to CA with Martha Nordstrand...It went on a journey to visit the needles of some very talented quilters who also attend the Valley of the Sun Retreats..and finally made its way back home where it took me another year or so to finish off the embroidery and quilting and to decide on the border...
At last...here it is!

Quilters who contributed to this are Ami Krenzel, Kim Diggins and Kathi Eddy
At last...here it is!

Quilters who contributed to this are Ami Krenzel, Kim Diggins and Kathi Eddy
Getting Back in the Saddle Again
Yikes..its been a VERY LONG DRY spell in these parts! Sorry for being absent so long.
I did attend Road to CA in January...took a couple of neat classes:
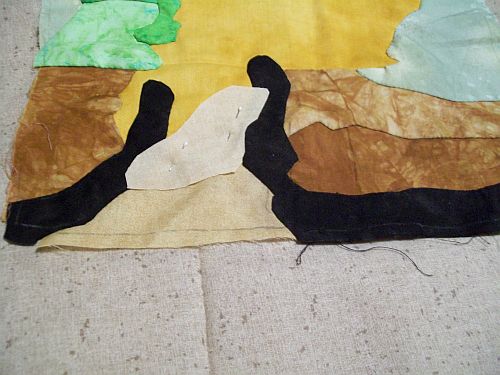
Tentmaker Work - I am almost done with this piece. It is going to be a pillow cover. This pic is how much I got done in the class...The class was taught by Egyptian Tent Makers..they are truly amazing applique-ers!

Images in Landscapes -
Loved this class but unfortunately, have not worked on this project very much since January. Class was in how to blowup a snapshot into a wall hanging sized quilt...which you then can add traditional blocks to make an interesting focal point..mine will not get too much bigger than this as I don't usually do very many 'big' quilts...but I am thinking of at least adding a border of flying geese..we will see how inspired I get! The small picture is the photo I started with and then enlarged...looks pretty darned close, eh?

Project Bag - This was a fun, quick bag class..I went to M&L a few weeks later and bought a yard of headliner fabric to make more of these. I think I even have enough of the clear plastic...just need time!

I did attend the annual Valley of the Sun Retreat in February:
One of the highlights was making this Mystery Quilt...I think EVERYONE loved the pattern and how their quilt came out! Still need to quilt it though...

And..just went on the annual So Cal Quilter's Run and stimulated the economy!

One of my additions is a Thread Director...supposed to help eliminate breakage when using metallic threads for FMQ...will have to play with that soon!
I did attend Road to CA in January...took a couple of neat classes:
Tentmaker Work - I am almost done with this piece. It is going to be a pillow cover. This pic is how much I got done in the class...The class was taught by Egyptian Tent Makers..they are truly amazing applique-ers!

Images in Landscapes -
Loved this class but unfortunately, have not worked on this project very much since January. Class was in how to blowup a snapshot into a wall hanging sized quilt...which you then can add traditional blocks to make an interesting focal point..mine will not get too much bigger than this as I don't usually do very many 'big' quilts...but I am thinking of at least adding a border of flying geese..we will see how inspired I get! The small picture is the photo I started with and then enlarged...looks pretty darned close, eh?

Project Bag - This was a fun, quick bag class..I went to M&L a few weeks later and bought a yard of headliner fabric to make more of these. I think I even have enough of the clear plastic...just need time!

I did attend the annual Valley of the Sun Retreat in February:
One of the highlights was making this Mystery Quilt...I think EVERYONE loved the pattern and how their quilt came out! Still need to quilt it though...

And..just went on the annual So Cal Quilter's Run and stimulated the economy!

One of my additions is a Thread Director...supposed to help eliminate breakage when using metallic threads for FMQ...will have to play with that soon!
Monday, October 06, 2014
Around the World Blog Hop

I would love to know who exactly started this Blog Hop and when...I tried Googling but there are soooooo many Around The World Blog Hop posts it's impossible to find the first one. I agree with Sophie - there should be a master page somewhere that lists all of the hoppers...maybe a suggestion for next year's blog hop??
1. What am I working on?
The bottom of the Drip quilt. the colored part started out as a project in a class I took at Road to CA from Katie Pasquini Masopust. Most of the applique is done - I just need to finish that one last bottom piece (I don't care for how the under piece looks...) before I applique the piece to the border fabric.
The whole Drip quilt against the fabric that will be the borders - it is a very neutral looking piece of what must be home dec fabric - I have no recollection of how it came to be in my stash! It is a half yard piece, but from selvage to selvage, it is two yards wide. The Drip quilt will measure more than a yard when the borders are added. I was initially worried about using this fabric because it seemed a bit thin, so I washed it...and it still has the same crispy body. It should be fine, since this is an art quilt, not a quilt that will get washed a great deal. I love the color against the finely dotted neutral...I have another fabric that is actual quilting cotton that is essentially the same pattern in a different shade of tan, but I like the color on this one better. Plus...there is more of this one so I can applique it directly instead of cutting border pieces. I need to iron the color block, but will wait to do that until I finish that last wee bit of applique.

The mini Eclipse quilt - I did the blocks at last retreat. I put the center together by hand since that is the only way I can get nice sharp intersections. For the borders, I have been trying different combinations of the Fossil Fern fabrics and I think I like this one with the triple border of orange, purple and pink best. I keep finding more fat quarters of different Fossil Ferns almost every time I look through my stash. They are in a separate pile now. Need to get this one done before next Retreat as there will be a showing of all of the Eclipse quilts.

This is a detail from the Mixed Media piece from a class with Patt Blair at Road To CA...it needs a bit more quilting and the buttons need to be sewn on before I am happy with how it looks.

More buttons...

The whole Mixed Media quilt...with the buttons pinned on. Most of these are antique buttons from the stash I inherited from my Granny. (The green hearts are a more recent vintage!)

Framed Hexies - this was a project Pirate (another blogger I know In Real Life) started, decided she didn't like this particular technique for hexies so she gave the whole kit and caboodle to me. I worked on these during my vacation. Not sure what it will end up being...or how big it will get - there is enough done that with a couple more blocks, it would make an interesting table topper. But there are oodles of cut pieces still in the project bag...they are cute, quick and portable...and a conversation starter...

Tuscan Landscape - it is very nearly done. I added a flock of sheep on the hill after looking at some more pictures of this view of Tuscany which I have discovered is in Val d'Orsia. I may take the bottom edge quilting out since its getting too puffy...I need to quilt tiles into the floor and add some decorations on the archway.

My 'Forever Project' - the wee hexie basket...this is made with 1/4 inch sized hexies..I just have the background to finish..the boring part! It will likely get minimal quilting and be put into a hard frame to be hung on the wall when it is finished. (I need to take pictures more often...I see something I need to fix again!)

2. How does my work differ from others of its genre?
I tend not to use commercial patterns, though I have done some...and I really dislike making the same block over and over, so there are only a few quilts like that in my repertoire. And you won't find very many 30's reproduction fabrics in my stash. I tend to like either true-to-life colors or bright saturated colors. Batiks and hand dyes are my favorites.
3. Why do I create what I do?
I have always been creative - I come from a very creative family, where creativity is cherished. My paternal grandfather was a professional artist - there are still examples of his art on display. His brother was also a professional artist. Their father was a master jeweler at Tiffany's in New York. My maternal grandmother was a prolific quilter - she and her charity group made hundreds of quilts for the homeless. As a child, I designed Barbie clothes, dressed my dolls and stuffed animals, made all sorts of things - my favorite magazine when I was growing up was Pack-o-Fun. Every month, I would
I love trying new techniques just to see how they work. As a consequence, I have oodles of WIPs (Work In Progress) and PIGZ (Projects In Gallon Zippies) which is a common occurrence with most quilters, I suspect.
4. How does my creating process work?
I draw inspiration from all around me. Sometimes a new quilt is suggested by something I see, though a goodly number of them are class projects. I know some folks never finish what they start in a class, but I feel obligated to at least do something with the materials since I have invested time and money and fabric - I can generally figure out a way to finish any project (I would not have taken the class if I didn't at least think I would finish!) - some just take longer than others! I still have at least three in various stages that are waiting their turn to be finished. But...I will finish them - God willin' and the crick don't rise!
I noodle around with an idea for a while and mostly I can 'see' the finished product before I start...though I have been trying to loosen up a bit and try different things after the basic design is done..
I am supposed to tag three more quilters. It is getting hard to find quilters that haven't been tagged!
So...here are my tag-ees! I haven't heard back from the last blogger, but am putting her link info in in the hopes that she will reply back in the affirmative.
Rian of Rian's Pages who recently moved into a new house and has just re-started quilting. She has a very interesting technique where she uses large sheets of freezer paper with flowing designs, mostly rendered in yummy batiks.
Sophie of Sophie Junction who already did the Around the World Blog Hop post. I am fascinated by her use of color. Another of the quilters I know In Real Life as I have attended a Retreat with Sophie.
Tanya of ByTaniwa who is a quilter from Japan. She moved to Japan from the US to teach English...and ended up staying after she met her handsome hubby Tetsu. I enjoy reading about all of her adventures.
Monday, June 16, 2014
Visit to the Reagan Presidential Library
We ventured out to the Ronald Reagan Presidential Library on Saturday with DD for Father's Day. Got there just after they opened - a good thing, since the parking lot filled up quickly and when we left, there were cars parked all along the drive for almost a mile!
Very impressed with the grounds and the Library..we got to go thru Air Force One and the helicopter that Reagan used...the exhibits were very interesting. I even went riding with Ron:

What I didn't expect to see were QUILTS!! They had a baseball exhibit that featured a number of quilts along with bats, gloves, baseball cards, peanut roaster carts, uniforms, models of the old baseball stadiums, pinball games, pictures and even the traveling trunk that Babe Ruth used!..the curator said it was only 1/3 of the collection (Wow!) My apologies for the dimly lit pictures...they have a no-flash rule at the Library, the quilts were behind glass..and there is only so much you can do with editing..


This last one did not have a card explaining who the maker was:
 The Baseball exhibit will be at the Library til September 4.
Very impressed with the grounds and the Library..we got to go thru Air Force One and the helicopter that Reagan used...the exhibits were very interesting. I even went riding with Ron:
What I didn't expect to see were QUILTS!! They had a baseball exhibit that featured a number of quilts along with bats, gloves, baseball cards, peanut roaster carts, uniforms, models of the old baseball stadiums, pinball games, pictures and even the traveling trunk that Babe Ruth used!..the curator said it was only 1/3 of the collection (Wow!) My apologies for the dimly lit pictures...they have a no-flash rule at the Library, the quilts were behind glass..and there is only so much you can do with editing..
This last one did not have a card explaining who the maker was:
Subscribe to:
Posts (Atom)