well..I was looking at Craigslist..and saw a picture of this cute little lonely sewing machine and I just HAD to go look at her...and she followed me home...
Meet Borealis...Aurora's Little Sister...
She is 3/4 the size of Aurora...a Singer 99...She has a few flaws...the slide plate is missing, the hood to the light is missing, the key to the case is missing (but you can open it with a small screwdriver), the knee lever is missing.. and the case needs a good restore...Oh...and no accessories..
I intend on getting rid of the motor and turning her into a hand crank...hopefully I can separate out the light fixture from the motor..
But..overall, she needs less restoring than Aurora did..I think she has been locked up in her case for almost ever! She needs to come out and play!
Haven't checked her serial number to find out when she was made..Will get to play with her more on Thursday afternoon or Friday..
Tuesday, September 06, 2011
Monday, September 05, 2011
Driving Miss Aurora...
I got out some pre-cut patches of fabric today and sat down at Aurora...
On the seam on the third patch, I managed to get a piece of thread caught around the oscillating hook...eppp..Aurora came to a dead stop...OH NO...now what? I ended up taking the needle plate and the slide off to see better - could see both ends of the thread but tugging on either end got nowhere...dribbled a little Liquid Wrench on the thread and that worked its magic and I was able to get the needle to move just a wee bit..allowing the thread to be pulled out..WHEW!!! Back to sewing!
Here are the first 4-patch blocks I made..
The fabric for the 4 patches being exhausted (I got 7 of those 4 patch blocks out of the stack of squares), I used some other pre-cut patches that I bought at a thrift store..fabric quality is not really high (I suspect most of these patches were 'salvaged' materials like old shirts or skirts)..and started making HSTs...
Don't quite know what I am making yet, though..
I am getting the hang of starting the treadle going forward (sometimes without using the hand wheel!), but small patches are a bit of a bother, since you have to stop so soon after you 'get going'. I am loving it though...very cool to be using my feet to generate the power...
A perfect Labor Day activity...
Sunday, September 04, 2011
The Saga of the Tooth
Back in February, I had a tooth that went bad..it had been crowned over a root canal, but decay set in under the crown and it was time to remove the poor thing...Options were either a bridge with two new crowns on the adjoining teeth..or an implant...
I asked around and the consensus was the bridge is a PITA to keep clean..and that I might be happier with the implant..
I opted for the implant...and went to the periodontist associated with my dental office..from the information given, I knew there was some risk of numbness especially if the nerve canal was breached..and that the numbness typically can last from 3 - 6 months or more..
The periodontist pulled the bad tooth and placed the stem/screw piece of the implant...and I went home..the lidocane wore off..but my jaw stayed numb..Periodontist looked at the x-ray and said the stem is not into the nerve canal so he had no idea why my jaw was still numb...but to be on the safe side, he took the implant stem back out... and filled the hole with bone material..and said to give that a few more months and we can try again..my jaw meanwhile still was numb, but the numbness was getting less and less..
So..in July, I had the implant stem put back in..a shorter, stubbier, plumper version... and thankfully, the numbness in my jaw did not get any worse..it was however, a good bit more painful than the first stem placement. I discovered that cutting Percoset's in half and taking half every 4 hours was way better than taking a whole Percoset every 8 hours..
Its six weeks later..and my jaw still is a wee, wee bit numb..but I can see there is light at the end of the tunnel..
I get the abutment put on in October and the measurements for the new crown in November..and by Christmas I will have a full set of choppers again!
And hopefully, full feeling back! Oh that will be nice...
Tuesday, August 23, 2011
Put Another Candle on My Birthday Cake...
Had a late lunch with my parents and my DD on Sunday. Went out for dinner last night on my birthday to Claim Jumpers..the waiter brought me a Red Velvet cupcake with a candle...very tasty!
A couple of my presents (other than Aurora!):
A Braided Money Tree, a very old book signed by my Great Grandfather ( 1878!!),
A lovely rose pin and a treadle charm necklace.
Also got a new shirt in turquoise and brown and a set of towels and matching bathmats..the bathroom is looking pretty spiffy!
A very good birthday!
Saturday, August 20, 2011
Aurora, Restored
And...here she is - restored!
(click thru on any of the pictures to get to the Photobucket album with more details)
The front plate:
The bobbin winder area:
The bed and throat area:
The back of the head: (still needs a wee bit more of the Tar and Bug remover and some more rubbing!)
All cleaned up!
Now..to actually SEW something!
Friday, August 12, 2011
Aurora Restoration
I've rubbed the treadle cabinet with Howard's RestorAFinish..and it looks pretty good overall..the black rings are still somewhat visible - I have heard I need to treat them with 1/2 bleach 1/2 water..but just haven't done that yet..
DH and I re-assembled the cabinet and re-installed Aurora..
I have oiled and lubed everything that I can find that moves in Aurora..she still squeaks a bit though..may have to disassemble the feed dogs area as that's where the squeak comes from..
I replaced the winder ring on the bobbin winder - the old one looked kind of warped and chipped off like old chewing gum!! I had no idea rubber could 'rot' like that..
I cannot get the clutch knob to come loose..not that its a big deal though, it just means the needle still goes up and down when I wind a bobbin. One of these days I will probably get DH to take the head out of the case and up-end it so that Liquid Wrench can soak down into the knob..one of the guys on the TreadleOn list suggested whacking it with a rubber hammer..eeekk!!!
The decals are glowing brighter at least on the front of the machine (the back of the pillar is still quite dark - it will take more oil and rubbing!!) I just used sewing machine oil and most of the grime has rubbed off...
I put the belt on (fun...NOT) and then learned there is a simpler belt made of a rubber tube that has a metal join.that you don't have to pound a nail thru.so I ordered one of those..it has arrived (and came with a cute little treadle sewing machine charm!) but I haven't tried it out yet..
I ordered a quilt foot from a lady on the TreadleOn list..
I learned how to operate the treadle... It's a 4 step learning process...first you get your feet coordinated by treadling without the belt - you can 'throw the belt off' by using the belt shifter (it's how you get the head back down into the case), then with the belt in place and the presser foot lever up and no thread...then with a piece of paper and the presser foot down (still no thread)...then finally..once you can run the treadle for a goodly time, you add the thread and a couple of pieces of scrap material!
I successfully wound a bobbin, threaded the machine correctly, and SEWED!! This machine makes gorgeous stitches...
What a gas to have a machine that is so well made that 90 years later, it's still cranking and can be fixed by little ole me!
Here is Aurora - almost restored...(with all my tools still out), in front of the workroom window:
Don't know if you can tell she is on top of two pieces of plywood so the legs don't sink into the carpet..its very hard (nigh well unto impossible) to move the treadle when its up against carpet!
She still needs all of the chrome polished..but my polish dried up so I need to get a new can...
Meet Aurora...
My Mom called me up a couple of weekends ago and said she and my Dad wanted to get me either a Featherweight or a Treadle for my birthday later this month...so I should start looking..I popped onto Craigslist and found a couple of candidates..I really liked one of the treadles that was not too far away...
Went to look at her..and she followed me home!!
She is a 1921 Red-Eye Model 66...in pretty good condition - the decals are not worn at all and the cabinet has no breaks or bad scratches (the lady that owned her last I think did not sew even a single stitch on her..just used the cabinet as a plant stand - how sad) I need to do some scrubbing on the cabinet and use the Howard's RestorAFinish..and the head needs to be de-gunked..and she needs a new belt (the guy that sold it to me said the belt had been broken as long as he remembered his Mom having the machine)..
We broke her down into 3 pieces to get her home..the treadle legs and the head (in a box with an old blanket for padding) fit into the trunk, and the cabinet fit into the back seat..
Happy Birthday to MEEEEEEEE!!!!
Saturday, January 22, 2011
Road To California 2011 - Day Three
O. M. G....if you ever get a chance to take a class from David Taylor..DO IT!!! He is one of the best quilt teachers I have ever had...he is totally funny.. has figured out how to make award winning, very expensive quilts...and he is not afraid of sharing his techniques..
In the morning, we learned how he makes his patterns, prepared a tracing of the pattern we chose to do (either his penguin or hummingbird - I chose the hummingbird...) and made a freezer paper tracing of the pattern..cut those apart and ironed to the fabric (provided in the kit, thank goodness!) Then we learned how he 'buries' the points so that he does not need to make sharp points (except if they are on the outside edge like the point of the hummingbird's beak..)..and learned how he does the starching
During lunch..he was demo'ing the HandiQuilter Sweet 16...its the sit-down table model that HandiQuilter makes..I sat and watched him quilt for around half an hour!
After lunch, he broke us up into small groups and we gathered around his table to learn how he does applique..its a pretty neat technique..very close to how Ami Simms does her applique..only his pieces are prepared vs Ami's where the pattern is drawn on both pieces. He explained how he does the quilting using Sulky's Blendables threads..and how he changes colors...and buries the knots as he goes..and how he does binding..with a layer of polyester twill tape that keeps the edge from ever stretching!
I don't really have anything to 'show' for today as I only got 3 pieces of a 50 piece pattern sewed down!! So I will leave you with the teacher's version of the pattern:
Friday, January 21, 2011
Road To California 2011 - Day Two
Just went around the vendor mall today..bought a few things..
a fat quarter of a rock wall... the littlest kit of Wheel of Mystery (Laser cut batiks - finished size is 16x20) and the Texas Star pattern (Lone Star with 5 points instead of 8) from John Flynn's booth, 1/4 inch hexie papers for English Paper Piecing....package of John James sharps..
Did not buy a lot..but it was interesting...We went out for barbecue ribs and yam fries after shopping.. yummmmm
Class in the morning from David Taylor..really am looking forward to that!!
Thursday, January 20, 2011
Road To California 2011 - Day One
Just got back from my Scavenger Art Quilt class...it was really enjoyable and the teacher (Terry Waldron) was great.
My scavenged pieces for this quilt are the green ribbon on the left, the crocheted doily behind the cup of tea and the doily in the saucer (which was a plastic-y paper that was wrapped around one of the pots of flowers that I got in the hospital)..I used decorator fabric that I got free from the Fullerton Civic Light Opera (they had huge bundles of fabric scraps in plastic bags in front of their office - I was fortunate that one of the guys in my office mentioned the bags were there) to make the sunflowers, a piece of trim is the tea bag label and the teacher handed out a baggie of trims that had the green stems for the sunflowers..
There is an inspirational quote on the quilt as well - reads:
"We are cups, constantly and quietly being filled. The trick is knowing how to tip ourselves over and let the beautiful stuff out." Ray Bradbury
The pot for the flowers is a wee bit dark in the photo..its really much brighter in real life..but I may have to change out the brown behind it.. The cup I added last and its not quite really done yet..but you get the idea..
I only went into the vendor mall for a few minutes..got a couple of sample pieces of wool batting...and a couple of green fat quarters that I thought might make good leaves but ended up not using..but since they are batiks..they will get used somewhere!! There is this lady selling trims and buttons that I want to investigate a bit more tomorrow..She's selling hanks of stuff - $18 for a dozen hanks...
Got to see the quilts last night when I picked up my badge..some really wonderful quilts..the best of show was won by one of my teachers at Road 2010. best pictorial was won by the teacher I will have on Saturday..best painted surface was won by one of my teachers from Road 2010.. a lot of this year's quilts are definitely art pieces as they are quilted to 'board stiff'..but they are beautiful..
It's warm and clear and a bit windy...wearing short sleeves for most of the day!
Monday, January 18, 2010
Road to California - Days 3 and 4
The third class I took was 'Front to Back Pictoral Quilting' by Kathy McNeil..she was also one of the judges for the show. I love how detailed her quilts are..this is a link to her patterns. The default one for this class was 'Feathered Lady'..the swan..and a couple of people did do that pattern.. She covered so many topics in this class - my head is still spinning..we learned how to draft patterns, how to prepare the appliques, how to use a varieity of mediums to modify the fabric such as paint, ink, crayon and tulle..how to use the patterns on fabric as something other than what it was printed for and to look at both sides of the fabric for design opportunities...I have a different perspective on picking fabrics for landscapes now..
I chose to do my own design for this one - the Cape Blanco Light..and I wanted to do it at dusk, after the light is turned on...
For this class, I 'posterized' the picture that I used so it would print out over 4 sheets of paper..that comes out to about the size of a fat quarter (posterizing was WAY easier than tracing...)..I also made a black and white version of the picture so that I could tell where the shadows and highlights were..
This class we used a different method of applique prep than some of the others - we used Magic Sizing...you spray your piece and iron it dry to get the fabic quite crispy..then turn the edges with a steam iron..the steam makes the Magic Sizing hold the crease..in place where the turn under was a bit ornery, we used a light smear of glue stick.On some of the smaller pieces, I did do the full glue stick prep I learned in Martha Nordstrand's classes...
This is how far I got in the class in preparing my piece. the applique is designed to be done as a unit so that it can be moved around to find just the right spot after you create the background. I went to Joann's after class and picked up the fabric that is the glass (pearlized sheer fabric) and the light (gold lame' which I fused to a piece of muslin so it stops fraying)..there is also some shiny gold tulle to try to define the light pattern..
It needs the doors, the base of the building(which is the same red color but with some black netting over it to add a bit of shaddow, the foreground and some light rays - I bought some angelina fiber to experiment with and some gold Tsukeniko ink - maybe one of those will work..
In the evening of day 3, I went to Roundabout..which is 10 minute sessions by the teachers or vendors showing a technique or a product..there are a couple hundred rabid quilters, about 10 or so seats by each station and at the sound of the whistle, you run to another station to see what that person is demoing!
Kathy Kansier was showing some of her crazy quilt stuff - which I did not get to see in the class I took with her and one of the things she showed was a nifty beading tray -
So..I went home and made one for me! Its a piece of suede cloth spray basted to a piece of cardboard then inserted in a cheap picture frame - this one cost me $1 at the thrift store..the suede keeps the beads from rolling and the picture frame is small, rigid and easy to use on your lap..
Learned how to do freehand cutting with a tiny rotary cutter (Rob Appel), how to make a cabuchon around a mirror with beads, how to do free motion thread play (using tulle and Solvy) to make any embroidered object..will probably use this for shrubbery for the lighthouse foreground.. It was a fun 2 hours!
Road to California - Day 2
The second class I took at Road to California was 'Painting with Inks' by Patt Blair - she won one of the big money prizes for one of her quilts ($500!) - a portrait of an 18 year old Mexican folk dancer at the Padua Hills Theater..(the lady who's picture it is was in my third class!! She posed for the original picture 45 years ago!) And she won first place for a pictoral of a mountain lion..you can see those pictures on her blog
I chose to do one of Patt's designs for this class, though I could have chosen to do an original..I thought I would learn more of the techniques if I had her example to work from..and in the end, I think I chose wisely for this one. I used the pattern for the third quilt from the left - the magnolia blossom..Patt is a very interesting teacher and has load of great tips for using the Tsukeniko inks..I only had to buy a few more bottles of the inks to add to my collection.
Mine is alot pinker than hers...I like pink magnolias (they are 'Susan Magnolias'!)
You can see a bit of the design showing thru the PFD muslin where I didn't get finished with the last three leaves..I also need to add the background and probably will use a pale blue/lavendar instead of the yellow/oranges that Patt used..I am liking how this is turning out ALOT...
The day started out with a bit of excitement! I got to the parking lot and noticed there were LOTS of people standing around..turns out there was a fire alarm and they evacuated the whole building..If I had a quilt in the show, I would have been going nuts thinking about fire or water damage..fortunately it turned out to be a burned sandwich in a microwave back in the food service area..we were let in a little while later...
Road to California 2010 - Day 1
Annual Road to California Report
The first class I took was called 'Making a Grand Entrance' with Kathy Kansier - one of the judges of the 2010 show. In this class the objective was to enlarge a picture of our choice of a door, archway or gate using the Tracer Jr enlargers, transfer that enlarged design to a piece of foundation muslin and start audioning fabrics. I chose a picture of the Columbia River Gorge taken thru a stone archway on a bridge for my project.
This was how the classroom looked for the morning session...darkish! It did not quite get all the way dark because there were some spotlights that the convention center could not get to turn off. which made it harder to actually see the lines using the Tracer Jr enlargers - they really require a very dark room to see the edges.The first time we tried to turn off the lights , we ended up turning off the lights in two other classrooms! They were a bit distressed at that...finally one of the convention center guys came by and set it so we could at least turn off the overhead lights..
Here is my piece..it's pretty big for me...probably 30 x 40...I am going to make the edge of the quilt the curve and put fish tank tubing in a channel on the back to keep it arched..the pieces of fabric are just pinned to the muslin - some folks were using fusible, but I really don't care for fusible much..and it's the devil to handquilt thru...
I need to do a bit more to the bottom of the arch - it needs more definition to the ledge but I did not have much dark fabric to choose from..will have to be on the hunt for some..the greyish fabric came from another quilter (thanks!). I only had a fat quarter of the rock fabric..and ended up pasting a bunch of scraps together with OkToWashIt glue to make one of the reverse highlight pieces...I ended up with a tiny pile of very small scraps of that fabric..
I think I need something more as a focal point on the river scene..not quite sure WHAT though..and I need to do some shading on the green parts...
The first class I took was called 'Making a Grand Entrance' with Kathy Kansier - one of the judges of the 2010 show. In this class the objective was to enlarge a picture of our choice of a door, archway or gate using the Tracer Jr enlargers, transfer that enlarged design to a piece of foundation muslin and start audioning fabrics. I chose a picture of the Columbia River Gorge taken thru a stone archway on a bridge for my project.
This was how the classroom looked for the morning session...darkish! It did not quite get all the way dark because there were some spotlights that the convention center could not get to turn off. which made it harder to actually see the lines using the Tracer Jr enlargers - they really require a very dark room to see the edges.The first time we tried to turn off the lights , we ended up turning off the lights in two other classrooms! They were a bit distressed at that...finally one of the convention center guys came by and set it so we could at least turn off the overhead lights..
I need to do a bit more to the bottom of the arch - it needs more definition to the ledge but I did not have much dark fabric to choose from..will have to be on the hunt for some..the greyish fabric came from another quilter (thanks!). I only had a fat quarter of the rock fabric..and ended up pasting a bunch of scraps together with OkToWashIt glue to make one of the reverse highlight pieces...I ended up with a tiny pile of very small scraps of that fabric..
I think I need something more as a focal point on the river scene..not quite sure WHAT though..and I need to do some shading on the green parts...
Thursday, December 31, 2009
Wedding Stuff Prototypes
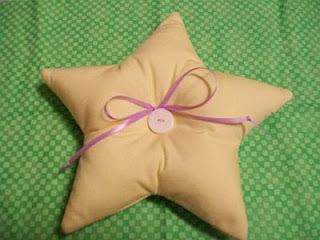
DD is getting married in May...I offered to make the ringbearer pillow and flower girl basket and since she likes stars, I said I would try to make them in star shapes...I finished the prototypes this evening...will have to see what DD thinks of them!
You have to imagine them in satin brocade...I just used some scrap material to see if the patterns would work out..so they are not even her colors..
First, I had to re-learn how to make a 5 pointed star out of paper for my pattern (yay Google!)...
The first ringbearer pillow I did was a flop..the points would not stay stuffed! and it was way too big..cut down the star pattern and made another one..this time I stitched each side of the star fabric to cotton batting..which when the seam allowance is poked into the points, makes them stay pointy..and the cotton batting seems to hold the polyfluff better..
This is the flowergirl basket..I only did one of these..and again, I think it may be a bit too big..On the real one, the outside will be satin brocade, the lining will be satin and I will probably use shiny rayon thread for the satin stitching. It does stand up on its own and I think its pretty cute! The bows should probably be bigger satin ribbon...and I think they may end up pink, as that is one of her colors...
Horsing Around...
A few weeks ago, one of the bloggers that I follow announced she had just gotten a new fabric line that she designed published..she had a little contest and I was chosen to recieve some of her very cute fabric to make a pillowcase...So...here is the pillowcase and if you guess that it's going to DGD, you would be guessing right! She has a LARGE collection of horsies..but so far, not a horsie pillowcase!
You can see the whole fabric line here. Isn't it just the cutest design?? It's supposed to be in Quilt Shops sometime in February in case you are interested in getting some for yourself..
I love the main panel! Have to see if DDIL would want me to make a wall hanging for DGD's room out of it:
Christmas Gifts and Cards
Here is one of the Christmas gifts I made this year..the number of folks that DH and I exchanged gifts with this year was cut down to just our kids..the rest of us donated to a charity and we had a marvelous Christmas Feast!
A little fleece pony that I made for my DGD:
And here are the Christmas Cards I made, I attached a Grany Star to the front of the card. The Grany Stars were all made with yarn and gold cording that came from MY Granny's stash that I inherited. All the materials for the cards were stuff I had on hand:
One day there was great excitement among the stars in the heavens. God had called a meeting of all the stars to announce something 'Very Important'. Each of them polished their rays until they sparkled and made their way to the meeting room, from the biggest and brightest stars, to the littlest star.
God told them, "I am sending my beloved son to Earth to give comfort to all the people. I wish to announce his birth by sending a star before him. I am looking for a very special star."
Each of the stars, one by one, came before the Throne of God and told of their qualifications.
“I am the North Star," said Polaris. "I help guide the Men of Earth on their journeys over sea and land."
Sirius said "I am the brightest star. I shine on all the Men of Earth."
"I am the closest star to the Men of Earth" said Alpha Centauri.
The parade of stars before the Throne of God lasted for quite a while. Finally God asked, "Are there any more stars?" From the back corner of the room a little voice was heard. "Only me, Lord.'
The Littlest Star made its way to the front and kneeled before the Throne. "I am just a wee little star. I don't have any great qualifications, My Lord. My light is hidden behind the other brighter stars. But I would be honored to be chosen to announce Your Son. I humbly do Your Will the best I am able. Whatever You say I should be, I will be." The Littlest Star returned to the back corner.
The meeting room was still and quiet as the other stars thought about what the Littlest Star had said.
Then one by one the other stars approached the Throne. "Pick another, Dear Lord. I am not worthy of such a great honor." And one by one the stars returned to their places in Heaven.
Soon, only the Littlest Star was left. "Why did they all go?" the Littlest Star asked God.
'Because, " said God, "each of the others told of their abilities. You were the only one to have faith in my abilities. You will be the special star to show the Earth my glory."
And so God made the Littlest Star into a blaze of beautiful light, shining brightly over the town of Bethlehem. Below, the shepherds in the fields were amazed at the light and became afraid, until an angel of the Lord appeared and said "Behold, I bring you tidings of great joy. For unto us a Savior is born this night." The angel pointed to the bright beam of light and said "Lo, He is born in a stable in Bethlehem." And the shepherds gathered their flocks and went to see the newborn babe, guided by the light of the Littlest Star.
The Littlest Star, its job done, still shines humbly in the evening sky, its light hidden by the bigger and brighter stars. But it still remembers those wonderful hours when it got to be the most brilliant star in the heavens as a reward for having faith in God.
Susan Noonan 2009 inspired by ‘Heli, The Star of Bethlehem” by Harrison Woodard
A little fleece pony that I made for my DGD:
And here are the Christmas Cards I made, I attached a Grany Star to the front of the card. The Grany Stars were all made with yarn and gold cording that came from MY Granny's stash that I inherited. All the materials for the cards were stuff I had on hand:
I put the following story inside of the cards..it's similar to one I read but that one was too long and not quite right for my purposes, so I wrote my own version:
The Christmas Star
One day there was great excitement among the stars in the heavens. God had called a meeting of all the stars to announce something 'Very Important'. Each of them polished their rays until they sparkled and made their way to the meeting room, from the biggest and brightest stars, to the littlest star.
God told them, "I am sending my beloved son to Earth to give comfort to all the people. I wish to announce his birth by sending a star before him. I am looking for a very special star."
Each of the stars, one by one, came before the Throne of God and told of their qualifications.
“I am the North Star," said Polaris. "I help guide the Men of Earth on their journeys over sea and land."
Sirius said "I am the brightest star. I shine on all the Men of Earth."
"I am the closest star to the Men of Earth" said Alpha Centauri.
The parade of stars before the Throne of God lasted for quite a while. Finally God asked, "Are there any more stars?" From the back corner of the room a little voice was heard. "Only me, Lord.'
The Littlest Star made its way to the front and kneeled before the Throne. "I am just a wee little star. I don't have any great qualifications, My Lord. My light is hidden behind the other brighter stars. But I would be honored to be chosen to announce Your Son. I humbly do Your Will the best I am able. Whatever You say I should be, I will be." The Littlest Star returned to the back corner.
The meeting room was still and quiet as the other stars thought about what the Littlest Star had said.
Then one by one the other stars approached the Throne. "Pick another, Dear Lord. I am not worthy of such a great honor." And one by one the stars returned to their places in Heaven.
Soon, only the Littlest Star was left. "Why did they all go?" the Littlest Star asked God.
'Because, " said God, "each of the others told of their abilities. You were the only one to have faith in my abilities. You will be the special star to show the Earth my glory."
And so God made the Littlest Star into a blaze of beautiful light, shining brightly over the town of Bethlehem. Below, the shepherds in the fields were amazed at the light and became afraid, until an angel of the Lord appeared and said "Behold, I bring you tidings of great joy. For unto us a Savior is born this night." The angel pointed to the bright beam of light and said "Lo, He is born in a stable in Bethlehem." And the shepherds gathered their flocks and went to see the newborn babe, guided by the light of the Littlest Star.
The Littlest Star, its job done, still shines humbly in the evening sky, its light hidden by the bigger and brighter stars. But it still remembers those wonderful hours when it got to be the most brilliant star in the heavens as a reward for having faith in God.
Susan Noonan 2009 inspired by ‘Heli, The Star of Bethlehem” by Harrison Woodard
Wednesday, December 02, 2009
Making 'Terry Birds'
Terry Grant designed a pattern for some cute stuffed birds...the pattern was published in the Special Commemorative Edition of the International Quilt Festival Quilt Scene magazine that is in the bookstores right now...its a dilly of a price ($14.95!!) but I wanted the pattern for the birds, so I ponied up the bucks! There are a couple other cute patterns in the magazine that I might make too, so maybe it will amortize out..
The wings are supposed to be fused with heavy interfacing..but for my prototype bird I just used freezer paper!! I know the bird is not going to get washed, so it should be fairly safe! On the prototype bird, the beak did not turn out quite right..it's a bit off center (gives Mr Birdy a bit of personality!)..And I did not have any wire to make the armature for the legs that allows the bird to stand..so he just has a bit of fleece for wee feet peeking out at the bottom.
I ventured out early on Black Friday to get some wire and the brown floral tape to make the legs..then spent at least half an hour arguing with the wire but it finally was pliered into submission..and as you can see in the picture, the Blue Bird does stand - so..it must be close to right! If I end up making a few more of these - and I probably will - I think I will build a jig for the feet.. The bird goes together pretty quickly after the legs are made and all the pieces cut out - 'stash diving' and deciding on just which pieces of fabric to use can take up a bit of time though...'Oh look..that one is really cool..but this one is even cooler..no wait..THIS is the perfect combo'.
The standing bird was made as a present for my Mom, who loves fat birds (she is the reason I wanted to make this pattern) When I showed her the prototype..she thought the two birds together looked really cute..so they both are living on her kitchen counter!
I have some lovely batiks picked out for the next bird!
Friday, October 16, 2009
Midnight in the Pumpkin Patch
Here is a little doll quilt that I finished...I did the Fall Doll Quilt Swap on the forum as a Challenge (being a swap virgin...and not sure if I could meet the obligation of making and sending a doll quilt in the allotted time period)..I was pretty much right that it would be a bit too much while I am still working..if I did not have to burn some vacation time due to a policy change in the number of hours we can carry at work..I would still be in the applique stage and not done..'course if it had been simpler, that would have been better too!
But..it's done and I think it's pretty darned cute..WAY too involved though...It's an original design...I kind of went nuts with the number of green leaves and the tendrils..the original did not look THAT involved when I drew it! (deceptive, eh?)..If I had done it with fused applique instead of needle turn, that would have been faster as well..The tendrils, grooves on the pumpkins and the kitty's face are done with stem stitching..I managed to use up an entire skein of green embroidery thread!
The yellowy orange of the large pumpkin was the nastiest stuff to stitch thru (and of course, it had to be the biggest pumpkin!!) I was very glad when the quilting on that was finished! The others were softer hand dyes - no idea how or where I acquired the yellowy stuff though.. Batting is wool, which, with outline quilting, makes the elements seem a bit three dimensional. It's quilted with clear poly..slippery, tricky stuff to hand quilt with! But..I like the effect - it does not intrude on any of the colors.
Tuesday, September 29, 2009
Penrose Posey is DONE
Penrose Posey
started Feb 2005. Finished Sept 2009.
Its an interesting story behind how the Penrose came to be worked on. There was a discussion about using mathematical concepts as designs for quilts on one of the forums I belong to...one of the ladies posted a link to some mathematical quilts that she had found...I went and looked at the link and saw some really neat quilts. A group of us were working on the Giant Dahlia pattern at the time and I thought the Penrose Tile looked kind of like a different version of the dahlia.
I mentioned it to one of the ladies who promptly designed the two tiles in EQ5 (Penrose Tiles are made of just 2 shapes - a narrow dart and a fat kite) as an exercise to see if she could do it.
I meanwhile was doodling on a layout..and figured out what colors I wanted where - the medallion reminded me of a flower...
Of all the parts about quilting, I like cutting pieces the least (actually I detest it) so the lady that designed the tiles templates said she would do the cutting for me for a very reasonable fee! I sent the fabrics to her, she marked and cut out the tiles and shipped them back to me...all nice and neat little piles of kites and darts...
I sewed the penrose medallion together - I think it took just a weekend to do the hand stitching of the tiles, designed the vines, and appliqued the center to my background - this was the first time I had cut out the background on an applique - decided it would just be too much to quilt thru if that extra layer of fabric was still there... it was pretty nerve-wracking before I did it..but it turned out fine...
Eventually, I was finally able to track down the designer of the mathematical quilts on the above link! Her name is Pat Storey and she lives in England. Her mathematical quilts were published in a magazine...amazingly, I just happened to see the magazine (the store only had ONE copy!) and had to buy it!
There is a lot of info on the web about Sir Roger Penrose - an English mathematician...and his tiling designs.
It took 4.5 years to finish this quilt..the first time I started hand quilting it, I was using cotton batting..and it was a bear to get the gold metallic thread I decided to quilt with thru the cotton batting..ripped it all out and restarted with wool batting..much easier, but still a tricky business hand quilting with metallic thread..
Here is a closer picture..the gold thread is a little hard to make out..but it does sparkle in person.
The vines were made with a Clover bias maker..I used Roxanne's Glue-Baste-It to keep them in place..the tile buds and leaves had the seam allowances glued under as well (that was before I had learned to do needleturn!).
It feels good to get one of my really long outstanding UFO's done!
(but I still haven't made my Giant Dahlia yet!)
Sunday, September 20, 2009
Landscape Friends Round Robin Progress
These are the Landscape Friends Round Robin pieces that I have worked on:
Kim's:
Kim's was round 1 for me..I added the dogwood blossoms which were made of felt rickrack, clear beads, florescent green thread and shaded with aquarelle crayons. I also did the seam treatments on the sun.
Ami's:
Ami's was round two for me. I added the fence, the flowers on the fence and the ruts in the road.
Kathi's:
Kathi's is round 3 for me. I went kinda wild with adding seam treatments on this one..knowing that I was the last one and did not have to leave some for a next person...I added the antique tatted lace and braid, the starfish, the oyster stitching, the shells embroidery and the real oyster shell in the sand area. I added the blue fish, a dophin and the coral by 'broidere pierce'..added some beaded and fiber seam treatments in the ocean part.
Can't wait to see what MINE will look like when the ladies get done with it!
Subscribe to:
Posts (Atom)