Pages

Saturday, May 21, 2016

Dragonflies Paradise


When last we left off on the Embellishment Sampler on International Quilting Weekend, I had finished the mounting quilt...and had a couple of the squares done..

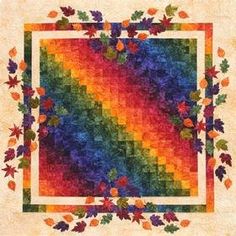
The whole thing is done now! I really, really enjoyed working on this quilt..its going to hang in my office...at least for a while.


Here are detail shots of each of the squares:
This was the first one I did...I really love the colors that were in the kit and how the outer border has all of the same colors..such a lucky find in my stash!

This one is probably my favorite of the blocks..though...

 ..this one is a close second!

The center..which I think was the second block..on the original quilt, the quilter, Shelley Swanland, used a silkie with a dragonfly on it..and everyone oohed and ahhed about that dragonfly, but my kit came with the roses - not to fear..I found a dragonfly in my stash of bits and bobs...and the rest is history!  At first, I was just going to have the one dragonfly, but DH said he looked lonely...so I found the other two big dragonflies..then had the wild thought about adding the charm dragonflies..which came in a big tub of assorted buttons and other odd pieces that I got at Tueday Morning a long time ago...
So...the quilt was named 'Dragonflies Paradise'!
I attached the center block with plastic turquoise beads..they have a wee bit of iridescence...


For the outer corner blocks, I attached them with turquoise glass beads that have silver centers...


and the center sides (not really sure if this is the correct terminology!!) I used golden glass beads.


DH may be disappointed this quilt is not going to hang in the house, but eventually I will bring it back home again.. He says he likes looking at all of the different aspects...there is too much to take in at once!


Sunday, May 01, 2016

Stitching in the Great Outdoors

More stitching on the Fire Mountain Bargello's applique today..we went off adventuring and I got to stitch in the great outdoors for a while..twas glorious!
There are oodles of oranges on those trees...
 Watched a para-sailor ride the updrafts over the top of this mountain...

 A crashed balsa wood airplane  on the upper left (I think)!
Some dark clouds...rain maybe (we hope!)

Monday, April 18, 2016

More Fire Mountain Bargello Progress

I decided to add a vine with birds, blooms, butterflies and leaves to the Fire Mountain Bargello -  I cut out multiple copies of  some simple shapes out of card-stock and  did a mock up of the design..I liked it..

Counted up the number of pieces of each kind of object (128 of them!) and traced them onto Floriani fusible wash-away stabilizer - this is my first major project using this method of prepping the applique pieces..Then..cut them out...that was deadly boring! Adhered them to the remaining pieces of the fat quarters from cutting the strips for the bargello...and then cut those out - more boring! Yikes..a lot of cutting for two days!

My first attempt at gluing was using a Sew-line glue stick..and wee screwdrivers...it was not ringing my chime - it was ok for a small project but I was never gonna get thru with THIS project with those tools. Thought maybe I would have to do needle turn - and wondered if I should draw around the wash-away stuff or if I should leave it in and fold around....laying in bed, I was pondering...I realized that liquid glue would probably work better than glue stick...something like Elmer's School Glue...only fly in that ointment was I don't HAVE any Elmer's School Glue..still pondering..when a light bulb went off..I DO have some Roxanne's Glue Baste It!

Then next morning I rummaged around and found the Roxanne's - first order of business was to clean the applicator tip..now I know Roxanne's says NOT to, but I think they have a vested interest in selling you a new bottle whenever the tip gets fouled...but being the resourceful sort, I have a wire that I can pass thru the applicator that my Dad  gave me years ago that clears out any stuck on glue..This bottle dates back to the first year I was quilting - circa 2003... Glue still was good since I keep my bottles of glue in baggies with the air squished out to reduce the amount of air that can get to them. A trial piece with the wash-away and I am in business! I decided to use my Pearl Periera Applique Tool and a Popsicle stick with a notch in the end (looks vaguely like a fork)..and commenced turning and turning and turning!  I was bleary-eyed by the end of yesterday! I really like the end of that Applique tool - it flattens out the folds and makes the edges really crisp..no need to iron!

Finished the turning and laid out the design and wow! I really love it..Just have to glue baste the piece down once I am happy with the placements so I can remove the pins and start in on the fun stuff - appliqueing!!

Ta Da! (picture does not do it true justice..its so much better in person)


Tuesday, April 12, 2016

Doodled Hexagon Mug Rug

I have finished the Doodled Hexagons...presenting the finished project: A Mug Rug! Hand quilted in delft blue thread on purple heavyweight fleece...


Doodled Hexagons

Monday, April 04, 2016

Fire Mountain Bargello Progress

I decided the size of the bargello was going to get too big when I added borders, so I took a few of the rows off..I ended up using the rows I took off as the color border between the two cream ones. There is very little of those rows left - mostly trimmings and a couple of two inch pieces..but..I like how its turning out..

This is what I made at Retreat:


This is how it turned out after I finished adding the borders:


I am tentatively naming this Fire Mountain..

And..now, I am trying to decide if I want to add applique to the borders..you'll have to squint really hard and use your imagination...the green pieces would be leaves, the blue pieces would be birds,  the rest of the colors would be flowers and butterflies...I will be making patterns sometime in the next few weeks..to try out the shapes..I do think I will like it!


There was a suggestion that I think about putting some flames on the 'mountain'...will have to try that shape out too!

Monday, March 21, 2016

What I Did for International Quilting Weekend

I binge watched a bunch of shows on The Quilt Show - every year they open up the prior years shows for free viewing...so I took advantage of that.. I think I watched 8 of them!

Learned a bunch of techniques...and once my 'creative juices' were revved up, I  turned my attention to the Embellishment Sampler that my quilting friend at work got me for Christmas...

It needed the mounting quilt - so that part is done!

I originally had a different blue floral for the outer border, but it just wasn't ringing any bells when I laid it out next to the partially embellished squares...so I rummaged around in my large florals bag and found a few other selections...this one won out...Originally, I had a bright green for the resting border, but my DH asked if I could find something to match the turquoise of the upper left flower..found just the right piece and I was good to go. The center is a vintage cotton hankie that I used Terial Magic on to make it board stiff...but since it is pretty thin, I backed it with a creamy muslin. Once the squares are finished being embellished, they will be attached to the mounting quilt with beads. 

I really like how this is turning out...DH keeps coming in to check the progress - I think he likes it too!

Sunday, March 13, 2016

Hexie Daisy Done

Finito!


Wool batting, all scraps from my stash, border, backing and binding fabric from donations table at Retreat. Quilted with candlelight quilting thread.

Painless Binding Join on the Hexie Daisy Quilt

I am finished with hand quilting the Hexie Daisy quilt so I thought I would photograph how to do the Painless Binding Join I learned from Shannon Shirley at Road this year. This is the easiest way to do the final join in the binding..no measuring, no pins...

First, prepare your binding..for this piece, I am using single fold, non-bias binding, but it does not matter what kind of binding you are using.

Create a 45 degree angle on the end of the binding  by folding and trimming off the folded part - you may already have a 45 degree angle if you are using bias binding.


Fold up the edge by around 1/4 inch - wrong sides together. Press.


Place binding on the quilt with the longer edge along the outer edge of the quilt..You will need to figure out where you want the join and do a rough guess on where the other seams in the binding fall (seams in the corners are kinda problematic!)


Sew binding to quilt, mitering corners. If you are using double fold, start a couple of inches away from the end...single fold, start right at the end.


When you get close to the start point, cut off the remaining binding, leaving an inch or so overlap along the same angle as the folded part. For double fold, tuck the end into the pocket and smooth down.


Finish sewing the binding down.


Flip the binding to the back and pin or clip. You can either stitch the fold closed or not - just like the miters on the corners (some people stitch 'em, some don't)


Et voila'...almost done!


Saturday, March 12, 2016

Patchlara

I never got around to blogging about making my Fairy Quilt Godmother last year. One of the gals on the forum pointed us to the Paper Panache website where, after answering a few questions, you were given your own personal Fairy Quilt Godmother pattern..Mine is named Patchlara.

The pattern  did not look TOO hard to do (HAHA!). I added a few extra pieces and changed a few things...made the hair a bit different...and eliminated the original locket on the necklace...and made the dress pieces solid instead of being cut in two ( I didn't want to cut up that gorgeous dress fabric!)...after piecing, her mouth looked way too severe...so I appliqued a more generous bottom lip onto her face. Oh...and she got rosy cheeks via some carefully applied rouge...

One of the gals on the forum took her pattern to Kinkos and had it blown up to double the size..which when paper piecing a Paper Panache pattern is a good thing! There were some parts that I ended up disparing of ever getting done..but I persevered...and she is done..When I quilted her, I added some gold netting to make her sparkle a bit...and added a cat charm to her necklace. She hangs from a wand on the wall in my office.


Meet Patchlara:


The scraps and scnibbles were collected into a pill bottle - Fairy Dust!


Sunday, March 06, 2016

Gran Jam

I can hear you saying to yourself..Who or what the heck is Gran Jam? Well..she is a 'Shopkin' , My 9 year old granddaughter asked for Shopkins for her birthday. I took a look at the Shopkins website and hoooboy there are SOOOOO many of these little figurines - they are anthropomorphized things you can shop for (there are also Petkins..wee animal items) There are oranges and apricots and hair dryers and cookies and donuts and wheelbarrows..you get the picture...they are currently on series 4...

Gran Jam is a jam jar...with granny glasses and a gingham hat... 
"Gran Jam watches over all of Shopville. She spreads love and slathers affection on the Shopkins, sweetening their lives with her kind words."

I could not find a Gran Jam in the store...so..I made one! Drafted the pattern one day at lunch. She is made of two different green fleece materials, purple gingham and a white felt face with pink felt glasses..I think she turned out pretty cute!


DGD was pretty impressed with her new Shopkin...said she was going to take it to school and set it on her desk..not sure how that will work out, but it made me glad that she likes it!

I even made a tag...


I had DGD sew the arms on..which lead to more sewing and crafting...

She wanted me to make a blue bird with red wings...


while she finished off a beaded necklace


and a landscape


She learned a whole bunch of new skills - threading a self threading needle (the ones with just an eye will come later), how to knot off when done with stitching, how to sew on a button, how to do a running stitch and the applique stitch (not very invisible..but hey...gotta start somewhere!) She did everything on the landscape except the initial knots on the thread..


Sunday, February 28, 2016

Back from Retreat

Whew..this has been a whirlwind of a month..

Went to my annual Retreat in Arizona again this year. This year I flew because the lady that I used to drive over with from So Cal moved to Arizona! She picked me and another Retreater up from the airport - we coordinated our flights so we would get there and leave within half an hour of each other..I stayed in her guest room the first night and then we moved to the hotel where the Retreat is held.

The hotel just changed hands..and all the staff changed from last year. We have been going to this location since (I think) 2006 or 2007...The conference room holds 32 retreaters - so far, they have only been ladies, but we wouldn't exclude a guy or two! (Some of the husbands occasionally come..one year they went target shooting, another they went to visit the airplane boneyard in Tuscon..)

This year the 'big event' was making a bargello quilt. One of the hostesses volunteered to lead the project and we jumped right in on Thursday, making our strata. In deciding to even do the class, I looked at bargello pictures on the internet and found one that I really, really liked its look:


I used 17 of the fat quarters that we got on the last Quilter's Run:

Here is my strata:


What I ended up with is the first nine pieces followed the pattern, the next 8 were the first pattern going backwards...I still had some my two strata left, so I cut that into random sized pieces until I couldn't cut any more and added them to one of the sides...so..its kinda unique!


Like that sample, I will be doing the borders similarly - though I haven't decided if I am going to use leaves or something else for the applique. The picture shows a bias scarf I made at retreat as well..just a wee quickie project!

I finished a bag that was on the donation table - the body of the bag was prepared with lovely hand quilting, it had one handle turned, the other handle was not sewn at all and the lining was already made. I think I know why it was never finished - that remaining handle was a bear to turn! When I got it home, I decided that the handles needed to be thinner than the original, so I folded them and stitched them down..then it needed a button closure so I stitched two buttons on - one with a loop of elastic that can loop over the other button...it has all of my little projects that I brought with me to retreat but didn't get time to work on in and its hanging in my sewing room. I like it!


One of the other activities was making a potholder - first they were posted on a board and we voted on our favorites..then they were used in the Left-Right game - one of the ladies wrote a humorous story that you pass the potholder from left or right depending on the directions in the story..Very funny!

This is my contribution:


And this is the one I ended up with --a pretty pink design:


The potholder display:


And this was all the buzz around the potholder display:

No...those ain't palm trees on the back...after all..it is a POT holder..the front features munchy foods...
Not surprisingly, it won first place in the competition!

Monday, February 08, 2016

More Hexie Daisy Progress and Packing for Retreat


Here are a couple of shots of my experiment with back stitching hexies - it works much better if the opposite outer edge is supported with a WonderClip. Do I like it? I think so. It's way neater than the whip stitch...and a bit easier to do than the ladder stitch (no folding) - when I try the ladder stitch, the stitches seem to still show though that may be just practice.. Will have to try to see if I can do this thru the glue on the Wee Hexie Basket...

I still have 14 wee side pieces to add to the pointy sides since I have determined this is going to be a straight edged piece..thought were it goes from there is anybody's guess at this point! 

I am almost packed for Retreat...I don't leave for another week..but I cannot stand not knowing if stuff will fit! This year I am flying, so have to be super conservative on what I bring...