Pages

Sunday, January 27, 2019

Road to Ca 2019 - Day 6 - Thread Painting and Thread Sketching

Instructor for this class is world famous Nancy Prince - and she is a wonderful instructor!
Taking this class was on my Quilter's Bucket List!

I don't know if I have ever had as good a teacher as Nancy..terrific class..and I learned so much!
Here is her butterfly on the quilt...she had us take one with our phones for reference...

She shows each step of the process using an overhead projection of what she is doing on the machine...so much nicer than crowding around a machine and barely getting to see what the teacher is doing...She gave us reasons for why she does each step the way she does and then had us do our own!
 
Here is what I finished in class for the thread painting part of the class. Just have a few more white areas to finish and the top yellow-gold area..I kinda think he needs a second wing (though I have seen plenty of pictures of Monarchs with their wings folded together like this)...so I may add the second wing (makes mine different than the teacher's!) and I think I need to tone the red down to a burnt orange..and the bottom part needs another pass or two with the lighter yellow or maybe a light gold...and it needs some more shading...Thread painting is like coloring books...you have to blend the thread by layers... many layers! All of her thread paintings are done the same way we did in class...off the quilt and only attached after the quilt is quilted, bound and has its label on! She uses a stencil cutter to singe away the edges of the bridal tulle that supports the stitching - not having one of those, I will have to carefully clip the pieces of netting away... I have almost no distortion in mine - just a wee bit near the top of the wing.


And here is what I got done for the thread sketching part of the class - just have to finish the one butterfly in the top left corner....now..I am thinking I am going to use the Inktense pencils and color in the objects... The lines look darker than they will after I wash the Solvy off - if you look at the bottom where I traveled from one spot to another without lines, that is the real color...because the design was printed on Solvy with an inkjet printer, the thread just looks darker..

I finished off this year's show with a massage..(I get one every year...they are so soothing to aching backs!)

Road to Ca - Day 4 - The Quilts, the Vendor Mall and Party Time!

I got to the Convention Center and noticed a whole lot of people streaming up the sidewalk..one of the ladies said there was a fire alarm and they evacuated the Center! So I stopped walking towards the Center and talked with a Security Guard  for a few minutes and after a while, we noticed they were all going back into the Center..Made my way to the Center and almost immediately ran into one of my friends! It was fun to catch up with her!

Saw all of the wonderful quilts (Road to Ca will have pictures of them on their website in a few days..much better pictures that I would take!)
Here is one that I really liked:
Espalier - Joann Webb


Walked the vendor mall and found a booth for a designer that I follow - this was her first time at Road...I asked her if she had any of her cute HedgeHog fabric and she said it had sold out almost immediately! (this was the first day of the vendor mall!) She offered to look at home to see if she had any so I did come back on Saturday and got a piece...soooooo cute!

I met up with one of my friends after she got off work (one of the same gals that took the shirt class on Monday) - we walked around a different part of the vendor mall...

After the vendor mall, it was time to get in line for Party Time...we snagged some food and were probably 20th or so in line...We knew a group of other friends were going to be coming so we got to a table once the room opened up and we had 9 seats filled! Two were guys! One of the gals had persuaded her hubby and her brother to join her and her sister-in-law in the quilting adventure - they each have their own Featherweight!!

The theme for this year's party was Elvis (they had a traveling tribute show of quilts featuring Elvis) - our table's name was Hard Headed Women...one of the guys said...but what about us guys..so he wrote '...And Two Guys' on the card! This same guy got a huge set of fabrics from the Left, Right, Center game...a beginning to his OWN stash, LOL!

Loot that I came home with:


There is an Infinity Scarf  kit in there! (so I will have two!)...A king size quilt backing, a crib size batting, a pounce pack with miracle chalk, chalk pencil, sharpener and several stencils, a yard of Star Wars fabric, 3 fat quarters, a yard of Christmas fabric, three patterns, and  mini pack of hexies...I also have the fabric necklace that I won in the vendor mall - fabric is rayon - makes a really nice necklace!

Road to CA 2019 - Day 3 - For Anne

This class was an applique class where we were learning to us the Appliquick tools... Teacher was Diane Kirkart.

This is the end goal! A pot of flowers!


We worked on just the bigger of the roses and the bigger of the amaryllis flowers.

Here is what mine looked like at the end of the day:


Not dreadfully impressive as to quantity..but I did like the technique enough that I bought the Appliquick rods...one has a 'pickle fork' end and the other has a kind of a hoof! Better than my homemade version of a Popsicle stick with a grove in the end and Pearl's wooden turning tool (it got  very gummy with the gluestick).


The gal (Rosa) that invented these tools was also at Road and was demoing in the vendor mall...I ended up watching her technique and it was a bit different that what I was struggling with in the class..I hope this will make the rest of the flowers turn out better!
She has some really nice scissors..with an extra hole and a kind of a curl at the bottom...would be nice to have but they are so pricey!! Maybe someday...

I have most of the applique done on the inner pieces...not quite sure how to do the stamens on the amaryllis...gotta read the pattern to see if she describes how to do them. And I think the pink needs to be darker...so I will go over that part again..

Road To CA 2019 - Day 1 - Double Gauze Class

Road to CA 2019

I colored my tote bag from last year...it was just begging for inking!


Day 1...Day dawned bright and WINDY!
This class was making a T-Shirt out of Double Gauze...a very interesting, lightweight and almost airy fabric...
My three friends that go on the Quilter Run also were in class so it was a fun day for all of us!

First we had to cut out the pattern...deciding what size was a major dilemma for me! I brought a t-shirt that fits to try to get a sense of how the sizing went..but finally just matched my measurements up to the package..one of the ladies at our table said sometimes she doesn't follow all the exact lines and so that gave me the idea to grade it to a larger size on the bottom since I detest shirts that hug my posterior! So I went maverick!! Turns out I probably could have gone a size down on the shoulder and sleeves.

My back was hurting quite a lot, so at the suggestion of this same gal, I moved my cutting board over to the ironing board so I did not have to lean over the table.

I had made a mat board tote bag a few weeks ago for my new folding mat. Its built on Peltex - a double sided stiff interfacing...
That worked out well!
After we cut out the pieces, we first sewed the seam on our domestics, then went to one of the sergers that was set up in the back of the room..might have been nicer to have twice as many, but...we all did get to use them.
We got done with the shirts so fast - even though double gauze is a squirrely fabric and wants to slide all over the place -  we were done right after lunch. Some of the gals bought Infinity Scarf kits from the teacher...but...I was looking at my leftovers and with just an extra seam, I figured I could do on from the scraps..so I did...
It felt GOOD to walk out of the classroom with TWO completed projects - WHOOHOO!! (that doesn't happen very often!) 


Saturday, January 20, 2018

Road to CA - Day 4 - Party TIme and the Vendor Mall

Party Time is one of the most fun events at Road..it is SUPER popular - evidenced by the number of requests begging for a spare ticket or two! 250 mostly ladies...at 25 tables, playing party games! Prizes are awarded...and there is chocolate! The vendors donate stuff for the prizes - Thank you, Vendors!!!

Here is the stuff I came home with...A Cuddle layer cake, a Machine Quilting magazine, a Stripology book, a crib size batting from Mountain Mist, a Road to CA folding bag (that makes 4 of them that I have now!), 3 fat quarters, a domestic machine ruler work ruler, a pair of super sharp embroidery scissors from Sharon Bradley and a Bohin purse pack...
 The purse pack has needles, a threader, a measuring tape, a pair of fairly sharp scissors and piece of very colorful woven ribbon..all in a cute folding bag..

I walked the vendor mall after my class until it was time to go to Party Time - 4pm to 6pm is the best time (only other better time is Sunday afternoon!) to visit the vendor mall..most of the crowds are gone and you can actually see the booths!...was only interested in a couple of things..I bought a 60 degree ruler - a small one - I figure if I need it longer, the long ruler placed over the edge will do the trick...and a sample pack of battings from The Batty Lady...Poor Batty Lady had their trailer stolen a couple of weeks ago..with 45K in merchandise in it...the trailer was recovered but it had nothing inside when it was found..The Batty Lady said she wished it had been the other way around - the trailer was 100% insured...but the merchandise was only 10%... 

Did see a wonderful applique pressing sheet  at the Sharon Bradley booth that I would love to have if it were not so pricey...its called Fusamat - it has wee little holes that make the fusible not leak out from behind the piece..and it is tacky - Sharon was able to lift up the pieces and all her pieces of the applique stayed stuck! 

I also watched a back basting demo..that lady uses a LARGE needle so it makes definite holes so you know where the edge is supposed to be lined up.

This is the kludged tote for my second class..not the evil one that tore up my back..This one is a laundry basket bungeed to the wheels of the ice chest..wish I had thought of this solution first...
Oh..and this year's tote bag from the Show...bag is canvas and the design just begs to be colored in! Which I presume I will do..but not today...

I am sitting here, wearing my Medieval Torture Device as a back brace. Evidently, its going to take at least 6 weeks to heal up..sigh....can't wait til Wednesday so I can get another massage..

Road to CA - Day 4 & 5 - Luminous Painted Ilusions

Oh...I loved this class with Esterita Austin...

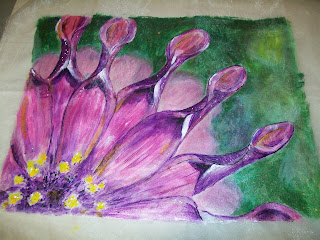
This is a mono-printing technique developed by Esterita..You paint a picture on parchment paper using metallic Lumiere paints...you can enhance with other types of paints or inks - but the base has to be the metallic Lumiere...the painting is then fused to a super sheer nylon organza with MistyFuse...

First, you blow up your selected photo..mine was a picture of a Cape Daisy (or Osteospermum) that was taken by a friend at work:

Then you make a 'cartoon' by tracing over the major details of the subject using Sharpie on a piece of vinyl:

Then you paint over any spots that are going to need other types of paints using white pearlescent Lumiere as the base..you can see the center of the daisy is whitish...then you paint the lights and add layers to make the shading..this is before I added the purple:

 This is after I added the purple, finished the center, and added opaque white highlights and Sharpie 'Stained' accents. Also added some Inktense ink..- you use the Inktense blocks like water color paints...as long as its over the metallic Lumiere..it will transfer!


This piece was done in two chunks...the flower in front, and the background - you fuse the front piece first, then add the back piece..and if anything doesn't transfer, you add more MistyFuse and try again! 

This will get fused to cotton batting, and quilted..not sure if it will be quilted by Retreat or not, but it will be coming to Retreat!

Once again, I did not attend the preview show..it's such a madhouse! And..my back is still bothering me..

Wednesday, January 17, 2018

Road To CA - Day 1 - Stained Glass Quilting, Allie Style

My contraption and I headed off to class bright and early Monday morning...unfortunately...the closest way to the doors at the Convention center was thru the parking lot..BAH!! my contraption did not keep up on the rough pavement! I ended up wrenching my back trying to keep the machine upright...and my poor back is still whining...

---

Oh well..the class though was SPLENDID! I got to meet Allie Aller...and spent the day learning her Stained Glass Quilting techniques:

Here is a picture of the class and the lovelies created

This is my leaf block (with purple bells)


This is my exercise block for the leaves...looks kind of like Tiffany or vaguely Egyptian to me!


And this is my set of blocks from the morning


I  chose to do my 'leading'  in gold..the lady next to me used a Kaffe Facett print...I think the rest of the class used black.. You actually can use anything for the leading as long as it contrasts...and it does not have to be fabric...it can be ribbon, yarn, embroidery thread (the thicker stuff works better). 
The block with blue fabric was my 'trial' from home..I had a wee strip of stuff with fusible that I cut off the bigger block for the class...I had to find out the answers to several questions! Would my machine like stitching over this stuff - its a bit heavier than normal quilting cotton?... what color thread?... what stitching method was I going to use?  I tested narrow zigzag, wide zigzag, feather stitch, short stitch length, long stitch length, single row of straight and parallel straight... would my iron make marks or discolor the gold fabric and would my little Petite Press iron  get hot enough to do fusible?... turns out I had some gold Glide thread that was just right...my machine handles stitching on it just fine, I settled on the parallel straight stitching and the Petite Press works a treat and did not discolor the fabric! Saved me a bunch of 'experimenting' time in class...
I used my 'redneck turntable cutting mat' - an old lazy-susan rotating shelf that the top layer cracked off...with a small cutting mat on it..I think I am going to mount a real cutting mat piece on it..it works quite well!
I am thinking of adding leaves in the ombre blocks..and making it on-point by adding triangles to the sides..maybe the leaves will come in from the setting triangles..we shall see!
----
I used the sidewalks on the trip back to the car..only had a small patch of pavement that I had to deal with..my back was on fire by then..

Saturday, January 13, 2018

Road to CA 2018

Road To CA 2018 starts Monday!!
I am taking a class on Monday - 'Stained Glass Quilting, Allie Style' from Allie Aller...
I am taking a class on Thursday-Friday - 'Lumionous Painted Illusions' from Esterita Austin....
Attending Party Time and the Jenny Doan lecture...
I shall be pooped by Saturday night!

Today I packed up for Allie's class..and boy...am I glad I did that today...
My sewing machine trolley broke an axle last Road To CA (in the middle of the road, mind you!! I was most displeased)...I 'fixed' it..but the wheels don't really turn too well and they are not something that can just be replaced...
I got a 'scoot around' a while back and have pressed it into service!


So the trolley is now sitting on top of the scoot around...I have it tied from one side handle to the other  with a piece of clothes line  thru those hand hold slots, snapped from the bottom to the top with two bungee cords (I was most fortunate to FIND the bungee cords!!) AND a lifting strap across the top...it's a kludge!
Took it out into my back patio and it works..well... well enough! At least it has the multi-directional spinner wheels...and if I go slow,  it's not too unstable..
I need a new trolley...sadly..I don't think they make this style of trolley anymore..it was a faithful workhorse for many a year...or I need to figure out how to get the bottom section OFF the current trolley and wire the scoot around to the bottom with maybe a piece of plywood for stability.. Project for another day...currently its packed for Monday's class..
Will have to get a picture of my contraption..

Embarrassingly, I find I forgot to post the rest of  last year's Road to CA show...chalk it up to not feeling well, I guess...it was a strange year...

Wednesday, January 18, 2017

Road to CA 2017 - Day 1

Class today was with Amanda Leins - Fundamentals of FMQ.


Enjoyed the class...hated the *(&#$( machine..the first half of the class, the machine I was on kept shredding the thread...I would be going along fine for a few minutes and blamo, it would shred and break. The tech changed the needle..that didn't help...she adjusted the height of the sensormatic foot...that didn't help...After lunch, I was able to move to a different machine - the lady next to me had to go home. Her machine worked fine! So I don't think it was anything I was doing (you have your doubts when its a strange machine!) Anyway, not feeling the love for Phaff machines, just sayin'

Amanda had this neato overhead camera gizmo that she could project up on the wall..with a Surface computer..I want one!! You can see it in the picture above..

Here are some of the practice drawings we did...


The color pencils show the order of how the motifs are to be sewn....I really like the loopys on the hooked feathers on the left side..

And my practice piece...not even half of the quilt sandwich I came with...


Oh..the air pressure in SoCal is so radically different today due to three back to back storms coming in  - the rest of the quilt show is going to be very, very soggy! Not attending the preview night this year..I have a monster headache. Hoping once it starts raining, the air pressure won't drop anymore.

Tomorrow I am going to see the quilts, go thru the vendor mall and attend Party Time - it's supposed to be a blast..there are prizes!

I had to repack all of my supplies for Friday's class..the wheelie case I have used for years decided it was a great time to break - right in the middle of crossing the road between the convention center and the parking lot! I don't think its repairable..I will just have to get a new set - wonder if they have any cases with the 360 wheels that I can afford.


Sunday, January 15, 2017

Fire Mountain Finished!

First finish of 2017 - Fire Mountain!

I bound it with some stripey fabric that has all of the same colors...I did not make continuous binding since I wanted more control over the placement of the stripes so I had to learn a different method of creating the miters - there are videos out there for a Binding Miter Tool (but I just used the corner of an envelope) that show the technique. I think it turned out very well!


Made a ZipZap bag for a Tea I am going to at the end of the month. Pattern is here...I did modify it a wee bit - I made the back pocket full length so my cell phone fits better..I am pretty happy with how it turned out! Those quarter inch straps though...those were hard!  Oh...and I did not use canvas, so the seams were not quite as bulky. I like this bag design in that it does not need 'hardware' for the straps..the other bag I made last year has lobster claws and rings...but it also attaches to my jeans belt loops for a hands free mode!

This is the front of the bag..added a silver dogwood blossom to the zipper...


This is the back of the bag..the pattern has the back pocket only as long as the color part in the center...on mine, the pocket goes all the way down to the bottom...


Thursday, January 05, 2017

More Fire Mountain Progress

I asked the same question in my last post to my quilting forum and got some tips on how to keep the Monopoly from breaking so much..I ordered a package of Superior Top Stitch needles and they came in the mail today (love Amazon Prime!!) So OF COURSE, I had to try one out...
Verdict..they are worth the almost 2 bucks per needle!

Pretty much done with the center of the quilt...just need to ditch around all of the appliques. That may not take as long as I think with the thread not breaking anymore.
Here are some hopefully detailed enough shots that you can see the quilting....


Poor quilt needs a bath..cat fur and chalk marks.
Oh and I discovered something else...I am using Grabberoos quilting gloves and was having a dickens of a time with the Monopoly sticking when I trimmed the start threads. Found if I used a lint roller, the trimmings came right off. Have to remember to pack that for both of my Road classes which are going to be FMQ...

Monday, January 02, 2017

Fire Mountain Progress

Spent most of the day working on Fire Mountain..I took all the old hand quilting out, replaced the batting with Dream Cotton instead of the poofy wool and started FMQ on the top..its stabilized...and I have started on the leaf vine in the green areas...


much happier with the quilting now..
but..frustrated with the machine..it keeps breaking the Monopoly...

Question...what does it mean when quilting with a FMQ foot when the top thread does not catch and form a stitch with the bottom thread? I have tried adjusting the tension and that seems to help some...fortunately it seems to mostly happen at the start of a line of stitching..

Saturday, December 31, 2016

New Year's Eve

Wow...forgot about posting to the blog for half of 2016...sigh..I will really try to do better next year!

2016 in review:
Finished a few quilts... Echos of the Grand Canyon, Goose, Goose, Duck; Dragonflies Paradise, Hexie Daisy, Thread-Sketching Bouquet, Embellished Antique Linen, Summer Quilt for Dad, Star Mug Rug, Doodled Hexie Mug Rug
Worked on a few more quilts ...Fire Mountain Bargello, Desert Landscape, Wee Hexie Basket, Cape Blanco Light, Columbia Gorge...
Ate lots of good meals...
Went on several trips - Arizona, Texas, Nevada and the annual Quilter's Run in So Cal
Laughed a lot...
Cried some...
DGD moved to Tennessee..we are going to try visit soon..
Still working...Retirement is looming though!

Hope 2017 will be a great year!

Here are the Christmas gifts I made this year:
Squirrel Lovie
 Frog Prince Lovie
 Wolf - kinda a lovie..but I stuffed him...
 Three French Hens
Hedgehog for my hedgehog loving Sis: (not a Christmas Present!) - I had to try out my PomPom makers I bought on the Quilter's Run...amazingly..they work!

I discovered Corner to Corner crochet...it works up soooo fast...
 ...that I made a whole passel of washcloths and handed them out at the Christmas party!
Our tree...
 ..with a silly squirrel under it!
And the mountains out the back on Christmas Day - as close to a White Christmas as us flatlanders in So Cal get!

Wednesday, July 13, 2016

A Star for a Star!

My daughter really, really likes stars...so I made a star wall hanging/mug rug for her birthday:


I fastened the ribbon holders on with a pair of starfish earrings. The star hanger I got on the Quilter's Run a couple of weeks back.

Paper pieced...this is about as much paper piecing as my tolerance allows. I must be getting a bit better though, since I did not cut any pieces too small and only sewed one seam with the fabric upside down when my mind wandered a bit..I have learned to use HUGE pieces of fabric for paper piecing, and if I cannot see the right side of the bottom fabric when I am stitching on the line...its wrong!

All star fabric, even the label on the back...

Monday, July 04, 2016

Happy 4th of July and A Summer Quilt for Dad

Happy 4th of July! Hope everyone had a great holiday!

I finished the top for a summer quilt for my Dad..I made him a flannel one for winter, but..he needs a summer weight one..He sleeps in a recliner due to some breaks in a couple of bones in his back..I made a pocket for his feet in the winter one. this one will also have a pocket for his feet...


This is mostly a kit that I bought on the Quilter's Run last weekend..I had to add the beige and red stripes at the top and bottom since the kit by itself is not long enough...I frenched all of the seams so that no straggly threads would show through since there is no batting..and the backing is a linen duvet cover - half of which is making the pocket for the feet.

Not sure yet if I will just birth it...or if it will get some quilting...I am thinking around the center panel, around the RWB stripes and across the beige stripe - maybe around the eagle and the USA..but..we will see when it gets down to it!

Thursday, June 30, 2016

HST Column Quilt

The HST Column quilt as a top:


Finished quilt: (sorry the color is bad - my normal snap camera is trying to die....and I used the cell phone camera instead..yuk!)


When I showed the top to my Mom, she thought if would make a marvelous summer lap quilt...so I finished it for her - just backed it with one of the remaining bigger pieces of fabric scraps and folded the edge to the front instead of binding.. I did try the quilting in the 'column' part to see if using a different color of thread would make the column stand out a bit more...the result of that experiment: it really wasn't worth it..it would require a way more dense quilting than I had the patience for to get it to change color...best option if you want the column to be noticeable...make those HSTs with a different color!

Here is a closer up picture:


But...Mom likes it and it will serve a useful purpose..and now all three of us have a quilt made out of those dress scraps from long ago.